

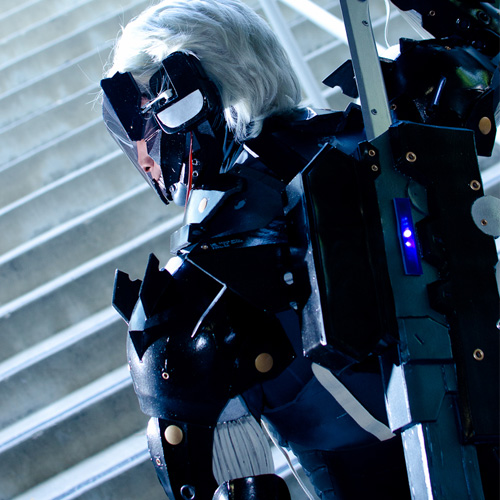
I was a big fan of Metal Gear Rising: Revengeance right after I first played the demo video game and thought Raiden was awesome. How can a cyborg ninja not be cool? This was a new challenge for me, as I have never freehanded a costume before. After a little research on google, this is how I ended up making my Raiden cosplay with motorized face sheild. Total time was about 12 weeks to make, which was much quicker than I thought I could make it. You can check out more pics on my facebook page:
https://www.facebook.com/andrewscosplay
—
Stage 1: Create Patterns From Reference Photos
I would say patterning is the most important step of making a costume or prop. With sub-par patterns, the end result will not look too great. There are times where I re-did my patterns multiple times till I felt okay with the piece. Looking at my completed Raiden now, there are still pieces I would like to re-pattern and re-make but I felt it was good enough for a first shot.
Materials I used for this stage (Paid links):
- Plenty of reference photos (I just google images and download whatever I can find)
- Ruler
 or sewing tape measure
 - Card Stock – 110 lb
- X-ACTO Knife
- Self Healing Cutting Mat
- Scotch Tape
Steps:
- I downloaded multiple photos online of Raiden in attempt to get every angle of his costume to make.

Raiden Reference Photos
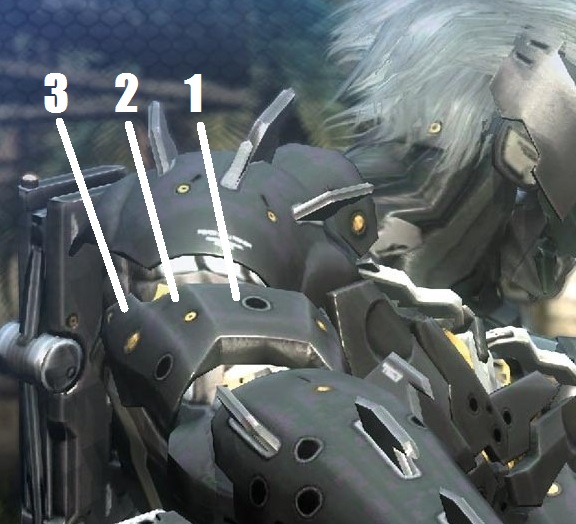
- I would then choose a piece that I wanted to make and then envisioned how many pieces I would need to make the part. For example, the bicep looks like it can be split into 3 main sections:
- center
- upper left side
- lower left side

Raiden Bicep Breakdown
Since this piece is symmetrical, I would just need to pattern the center and left side (then flip it over to use as the right side)
- In order to scale my pieces properly in real life, I would measure the total height of Raiden on the photo, take measurements (in centimeters) of the part I wanted to make, then use a simple formula with my height to get the approximate scale for real life.
 Measuring Raiden’s reference photo height Measuring Raiden’s reference photo height
Example: Bicep_center_length = (My_Height (in cm) x Raiden_Photo_Height)/(Raiden_bicep center_length)
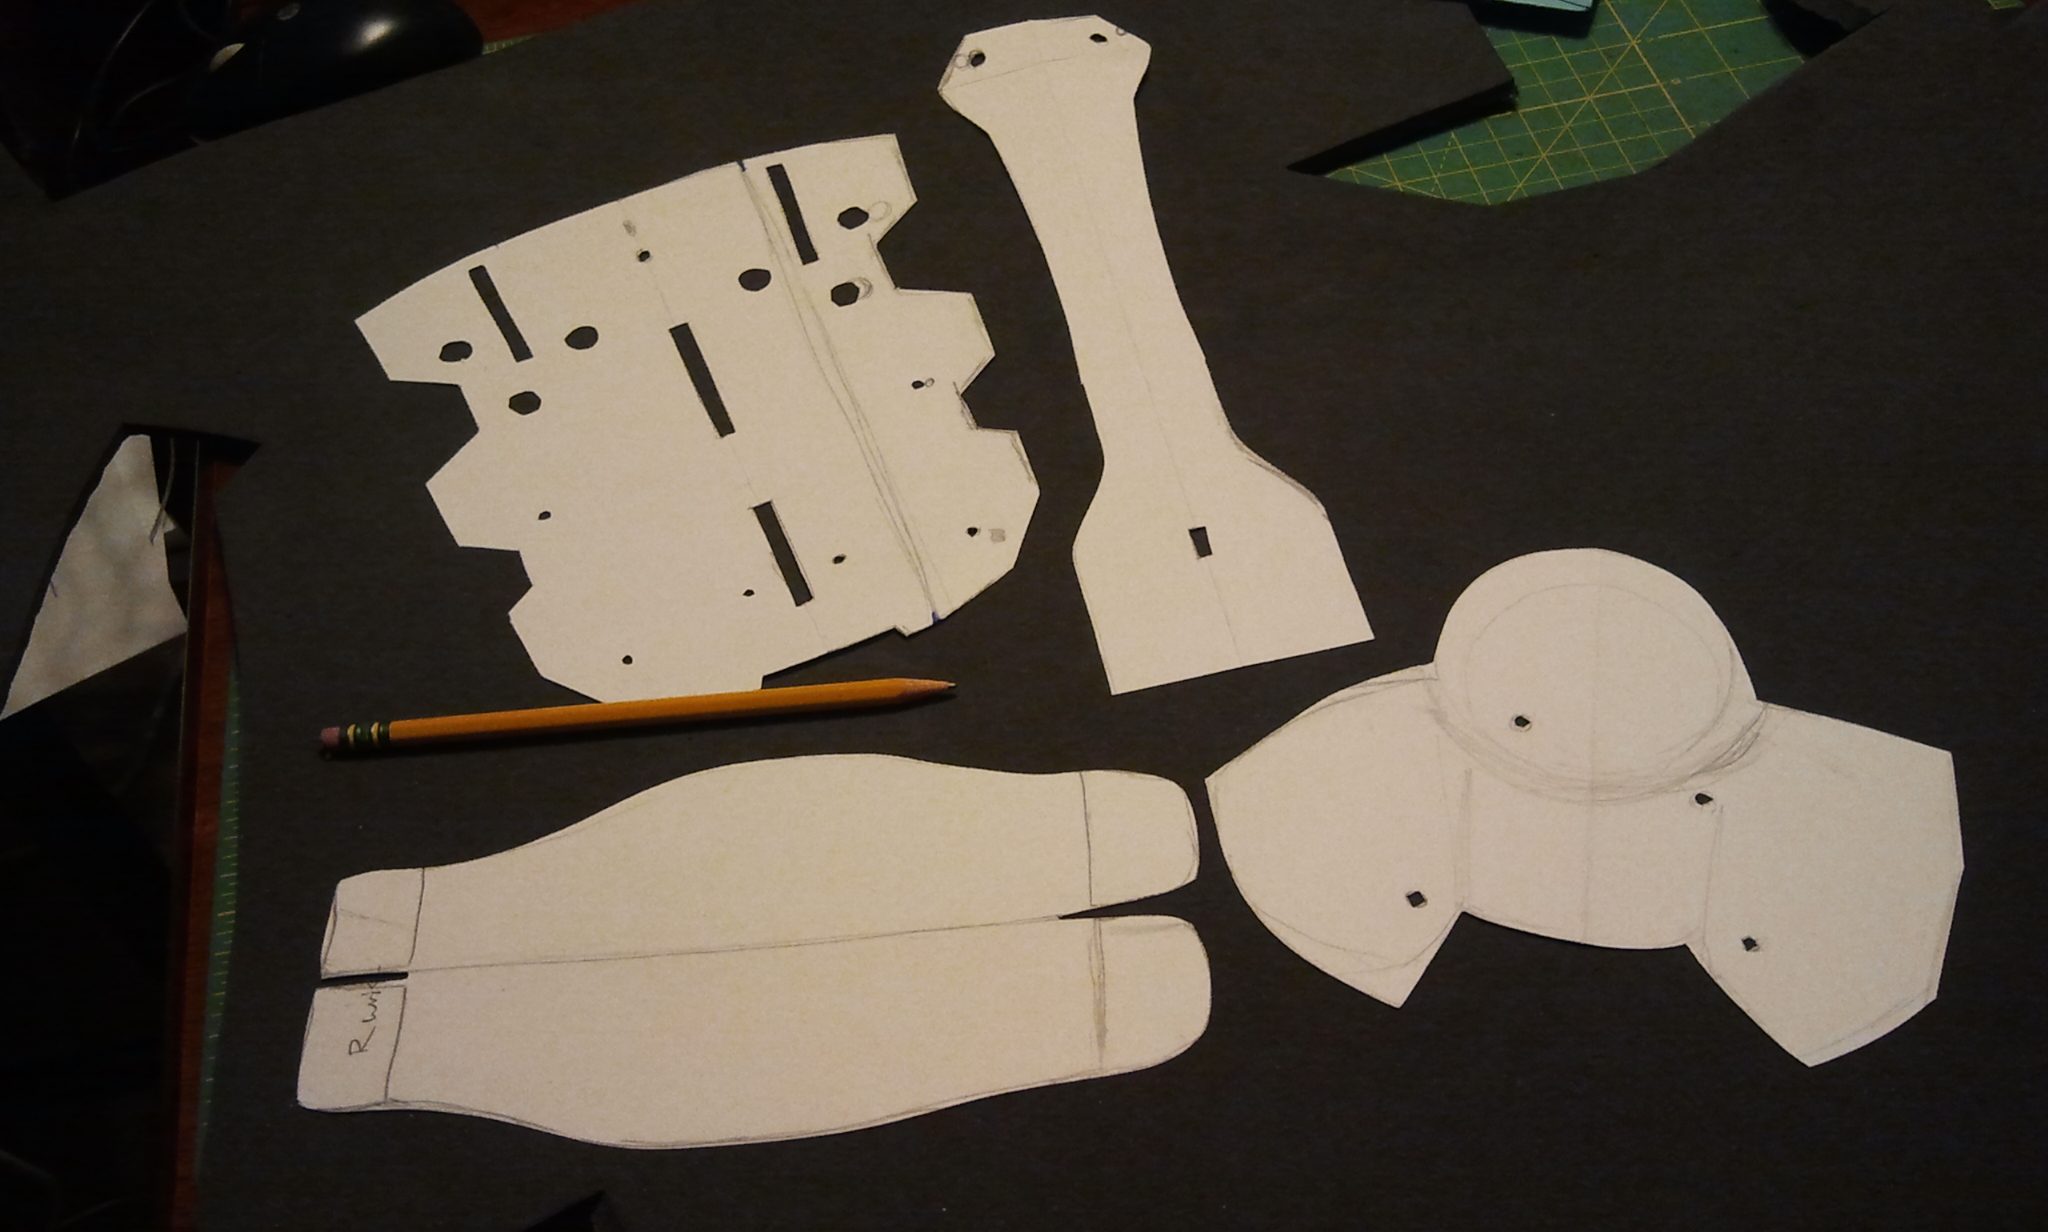
Bicep_center_width = (My_Height x Raiden_Photo_Height)/(Raiden_bicep center_width) - Once I had a width/height estimate of each section of the piece, I drew a box with those dimensions on cardstock. If the cardstock was too small, I taped sheets together with scotch tape to make a bigger sheet.
Patterning boxes on cardstock
- Within the boarders of the box I just drew, I would freehand sketch the part I was trying to make. I am really bad at drawing so it took a few tries till I felt “eh, good enough.” I also made sure to cut out holes for the 200+ grommet holes that would need to be filled later.
Freehanding bicep sections
- I then cut out the pattern with an Xacto knife
Bicep patterns cut


And that pretty much sums up how I patterned my armor pieces for Raiden. I used these same techniques for every section, including the props such as the sword and holster. By the way, here is the end result of the bicep piece.


Again, I want to reiterate patterning is a VERY IMPORTANT step in making your armor. Bad patterns will result in a bad end product. So, if you try these techniques and you are unhappy with how your pattern turned out, then redo it! No biggy! I assume you cosplay for fun just like me, so we’re not pros or anything!
—
Stage 2: Transfer pattern to foam
If the patterns were done properly, this step should not be too difficult.
Materials I used for this stage:
- EVA foam from hardware and craft stores of various thicknesses (1/4”, ½”, 4mm, 3mm)) (Here is an example: Anti-Fatigue Floor Mat)
- Glue Gun+ glue sticks
- X-ACTO Knife
- Xacto Board Cutter (for angled cuts)
- Pen
Steps:
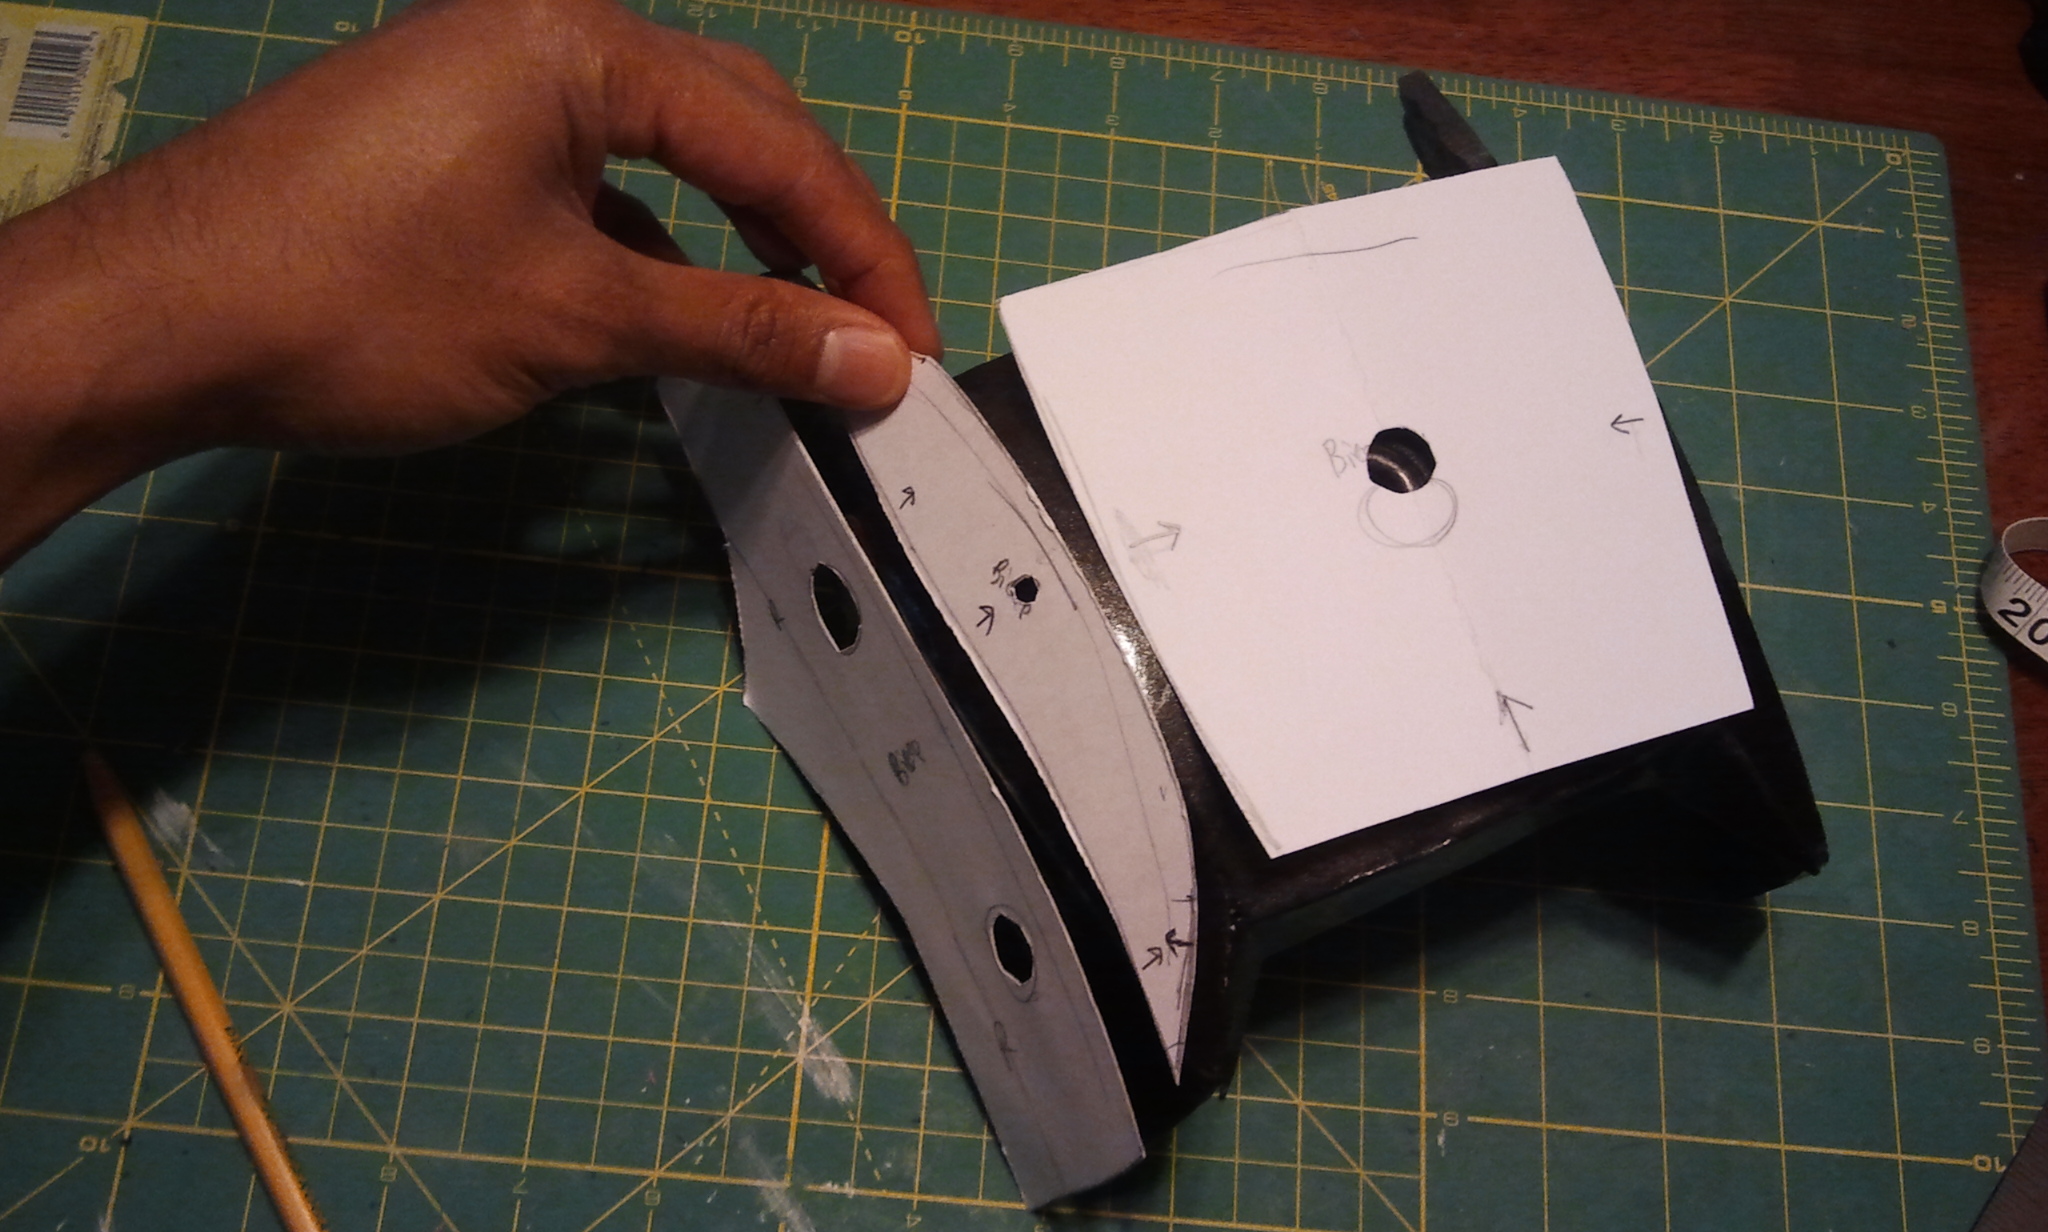
- I took the cardstock patterns created and traced them onto foam
Tracing pattern on foam
- I then carefully cut out each piece with either the xacto straight blade, or the 45 degree angle mat cutting blade depending on how it was supposed to attach. On the example bicep piece, I need to cut the center bicep piece at 45 degree angles in order for the 2 side pieces to curve around
Bicep pattern angles
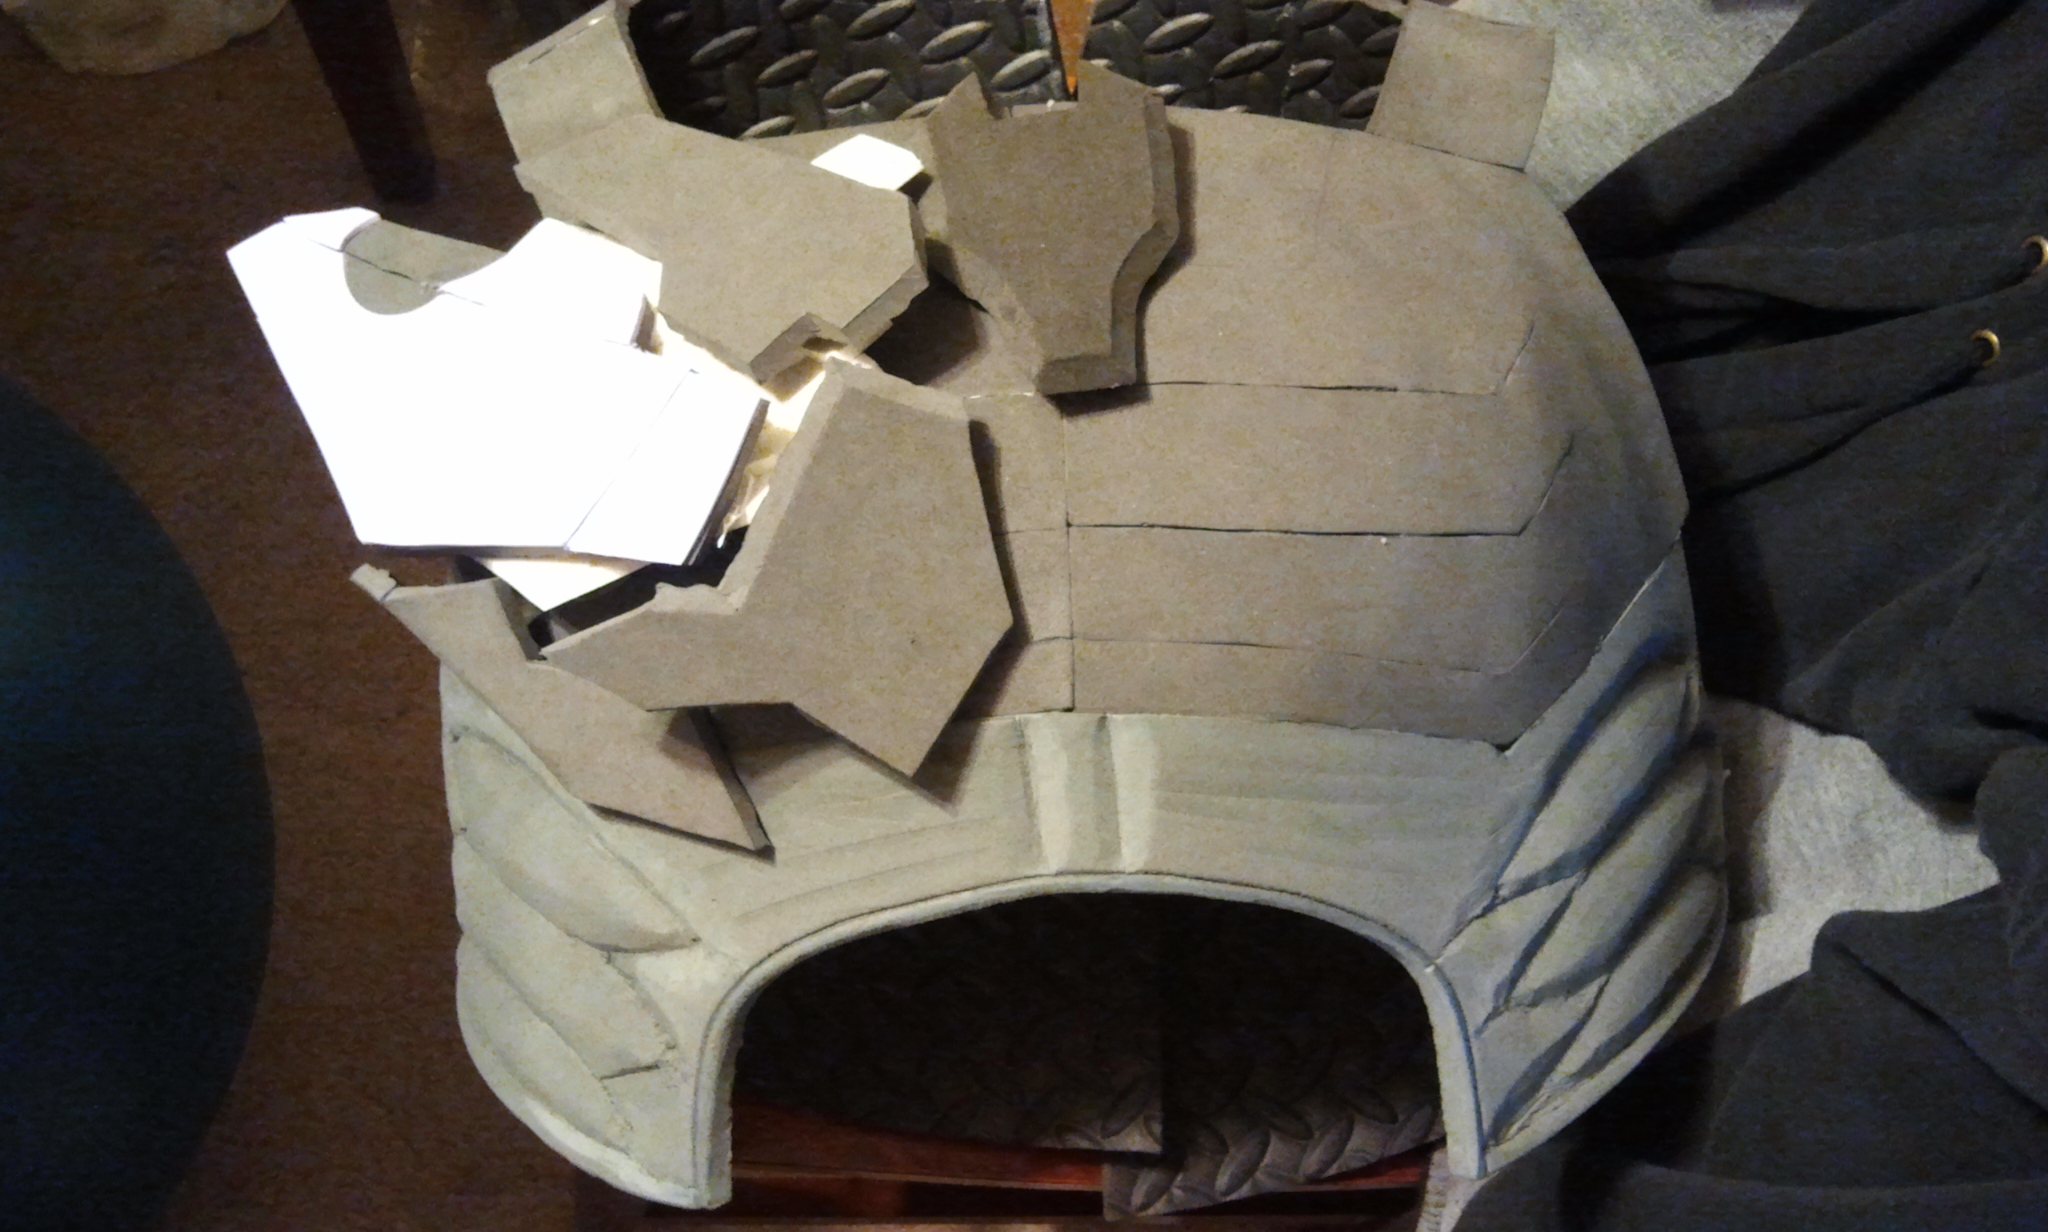
- I hot glued the pieces appropriately till the piece was formed
 Chest pieces
 Leg formed
 Cod piece formed Arm glued together
 Sheath
 Glove
Glove Chest pieces on chest base pattern


Note: I used ½ foam for the torso section in order to have a thicker piece to sculpt details in the detailing stage
—
Stage 3: Detailing and sculpting pieces
Materials I used for this stage:
- Brass Eyelets
- Paint (to paint the eyelets)
- Glue Gun
- Power Drill w/ various Drill Bits
- Dremel (The Dremel 4000 worked very well for me)
- Dremel Flex Shaft Attachment
(Makes handling so much easier) - Dremel Grinding Stones
- Dremel Sanding Drums
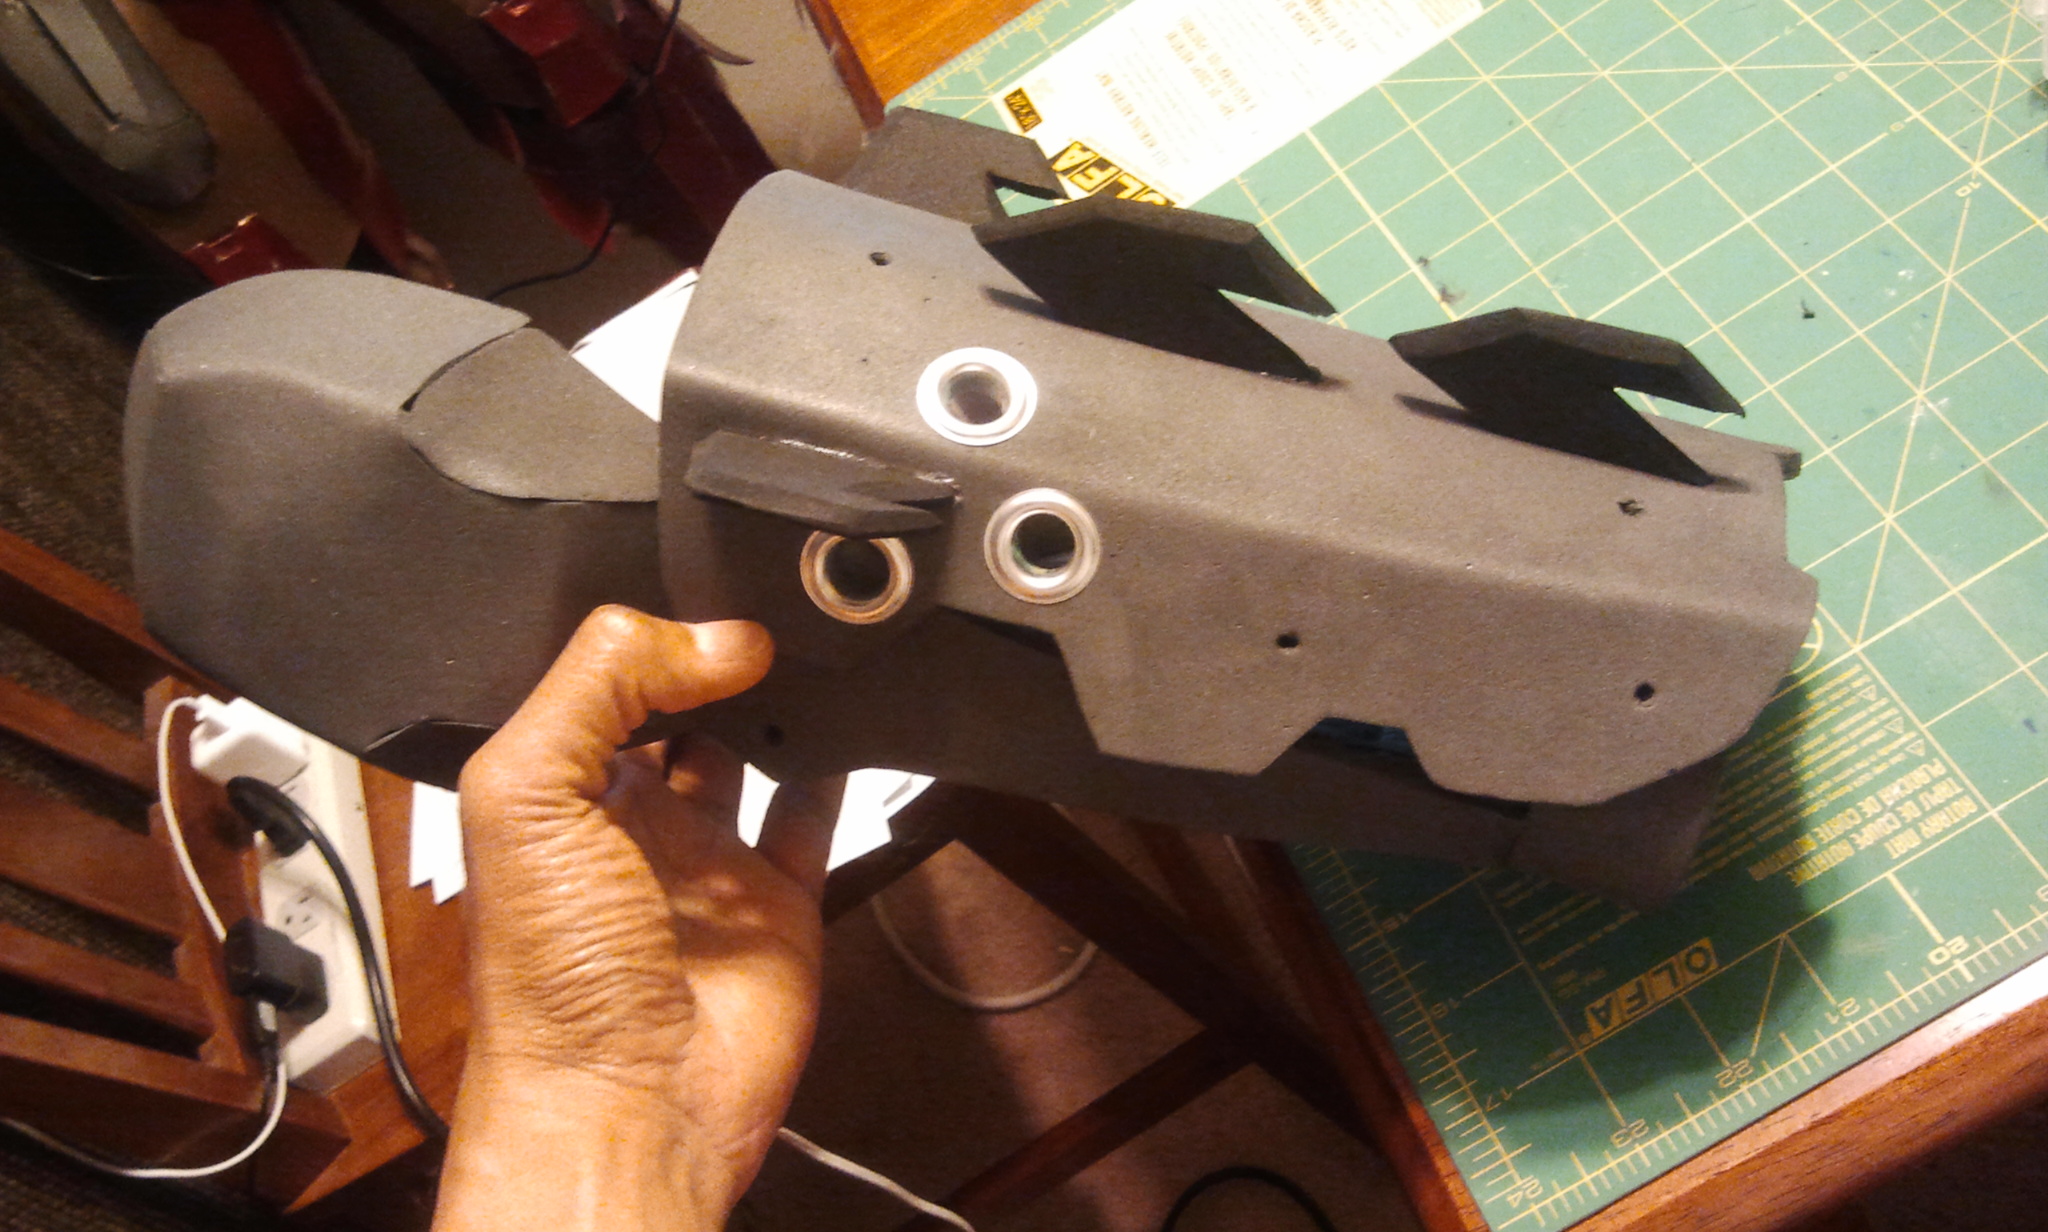
The details on this costume were crazy. I used over 200+ little grommets and disks to capture all the minute details. Some of them I glued after painting, some before painting.
Steps:
- In the previous step, I marked out holes in the foam from the pattern. I would then drill through these markings with the appropriate sized bit
- Next I would use my dremel with the grinding stone bit to clean up the inside of the drill marks
- I glued the detail pieces that ended up black before painting. I glued the gold details after painting.
Detail pieces glued on forearm. Small holes prepared to glue after paint.
- For the muscle pieces, I used a sharp pencil to engrave the fiber lines into the foam.
- For the rib muscles, I used a Dremel with a flex shaft attachment and various sanding wheels slowly shaved and engraved the foam till I felt the shape looked right. This was my first trying to sculpt foam so I practice multiple times on scrap pieces of foam prior to sculpting the final piece.
 Test piece for muscle sculpting
 Final sculpted rib muscles


—
Stage 4: Sealing and Painting
One of the biggest challenges when making foam armor is how to seal and paint it so it actually looks like armor and not “foam with paint thrown on it.”
Materials I used for this stage:
- Heat Gun
- Roscos Flexbond (But Mod Podge works fine if you can’t find flexbond)
- Disposable Chip Brushes
- Plasti Dip Rubber Coating Spray
- Organic Vapor Mask/Respirator
- Automotive Filler Primer Spray Paint
- Metallic Black Spray Paint
- Bulldog Adhesion Promoter (Pricey but an excellent brand that adds some flex)
- Automotive Clear Coat Spray Cans
In order to paint foam, it needs to be properly sealed or else paint will seep through the pores of the foam and will not be smooth. I have experimented with a few methods that I have researched through google and therpf.com (user DocHolliday has a lot of good methods) and this has produced good results from me.
Steps:
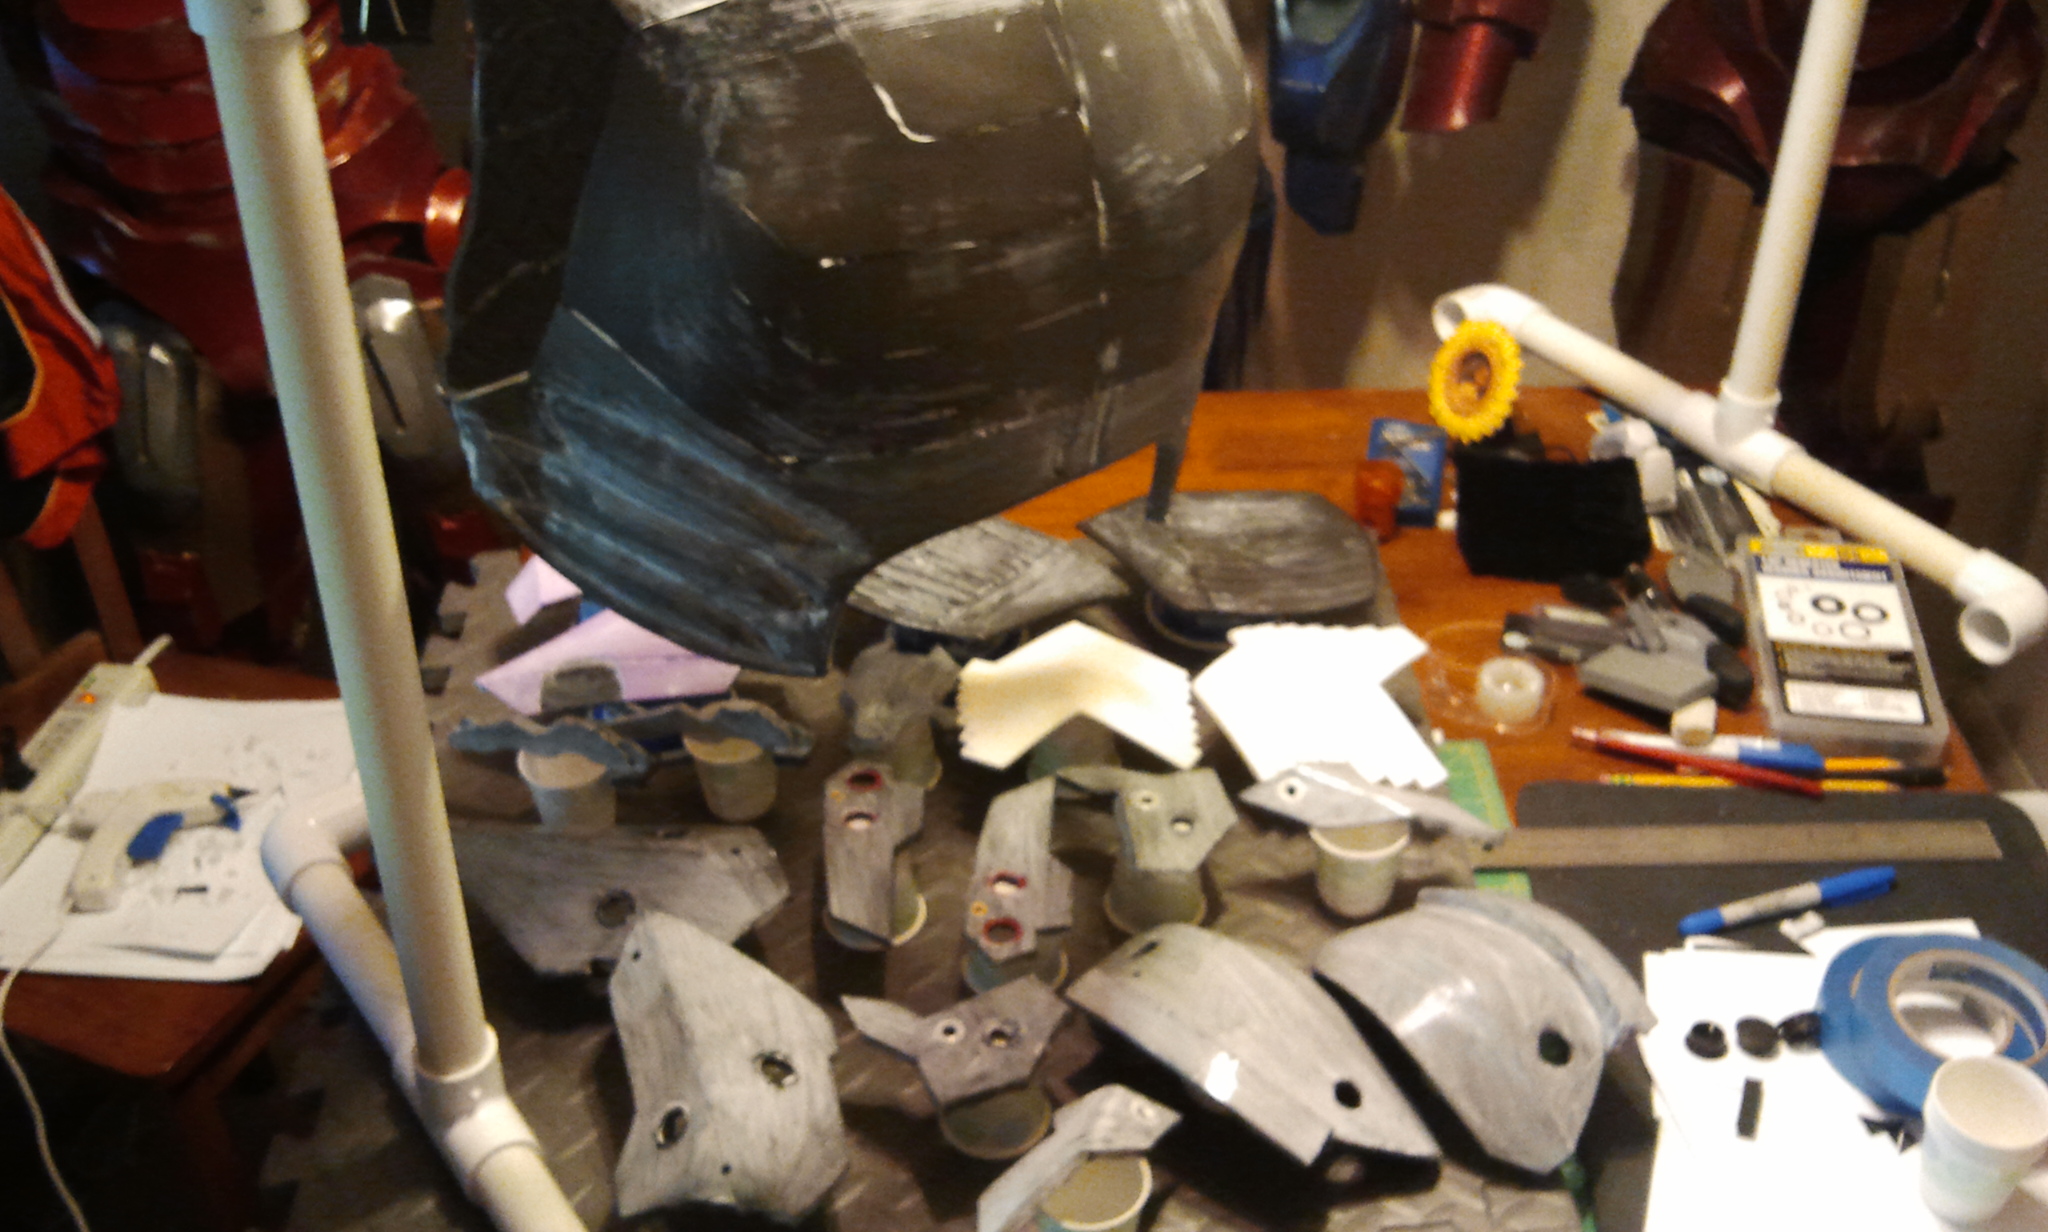
- I used a heat gun to pass over the foam until there is a slight glimmer/sparkle on the foam. You’ll know when you see it. I pass over the foam with the heat gun twice just to make sure the entire surface area is hit.

Raw foam
- One the foam is cooled, I used a brush to coat the foam with 2 layers of Rosco’s Flexbond (Recommended by a user named “Full Metal Sam”) which is a sealant that I found more effective than sealing with PVA glue (white glue) or Mod Podge. When I used PVA and Mod Podge in the past, I used 8 layers with about an hour of drying between layers.
Sealing Foam
- I let the sealant dry over night, and then I sprayed the pieces with 3 layers of Plastidip, waiting for each layer to dry for lat least 30 minutes before applying the next coat. You’ll know if you sealed the foam correctly here if you end up with a smooth application of Plastidip and no pores on the foam. Always remember to wear a good organic respirator as this stuff is toxic.
 Plastidip pieces Plastidip on torso
 - After letting the last coast of Plastidip dry for at least 4 hours, I sprayed the piece with 2 layers of Bulldog Adhesion Promoter per the instructions on the label, and then automotive primer. The primer is important as it will make your color look much better.
- Once the primer has dried for the recommended time per the label, I applied my color coat. For Raiden, I used a Metallic Black.
- I sprayed both Bulldog Adhesion Promoter and a Clear Coat spray on the dry piece to give it some shine and an extra layer of protection. The clear coat will give the paint the final pop so it looks shinny and metallic.
 Finished Torso Finished Forearm
 Finished muscle fibers


—
Stage 5: Mounting and Straps
Materials I used in this stage:
- Elastic Straps
- Backpack strapping
- Backpack buckles for straps
- Industrial Strength Velcro
- Compression shirt
- Compression Leggings
- Rare earth magnets
- Hot glue gun
Steps:
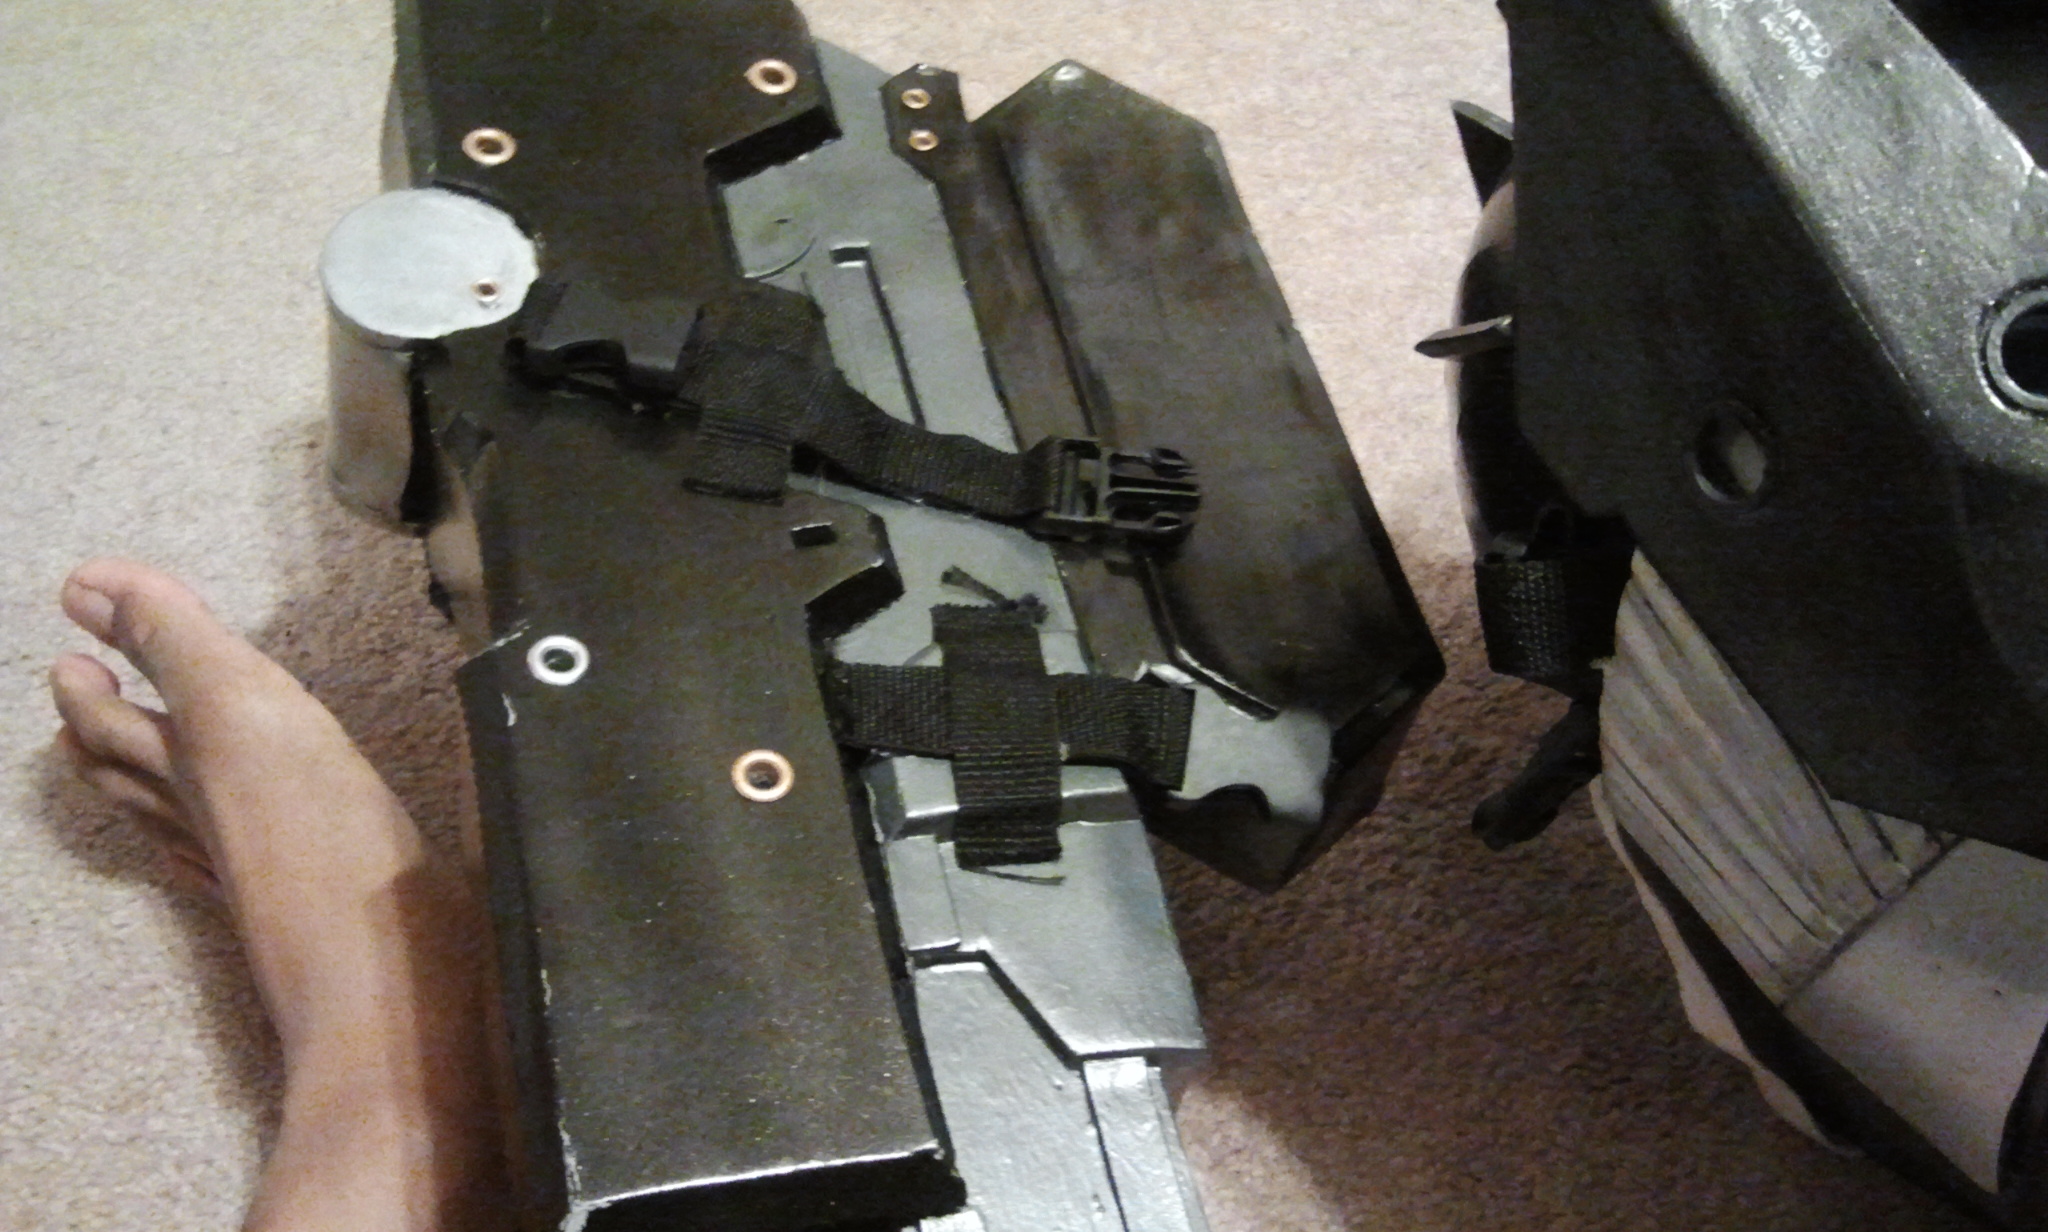
- For the chest/back piece, I used rare earth magnets attached to the spine to hold the back shut Magnets on spine and back Back held closed by magnets
- I used backpack straps and clips to attach the shoulders to the chest and back, as well as the sheath to the chest/back
Example backpack straps on clips on sheath and back
- I used industrial strength Velcro to attach most of the pieces to the compression body suit. I made sure to stretch the piece prior to gluing the Velcro strips to have a better hold. Velcro on body suit Velcro holding pieces onto body suit


—
Stage 6: Jaw and Wig
Materials I used for this stage:
- Halloween Skull Mask
- Foam
- Eyelets
- Paint
- Dremel w/ snake attachement and cutting wheel
- Elastic straps
- Arda Wigs – Cady
Steps:
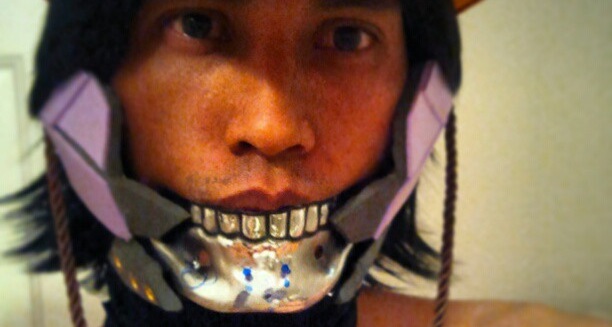
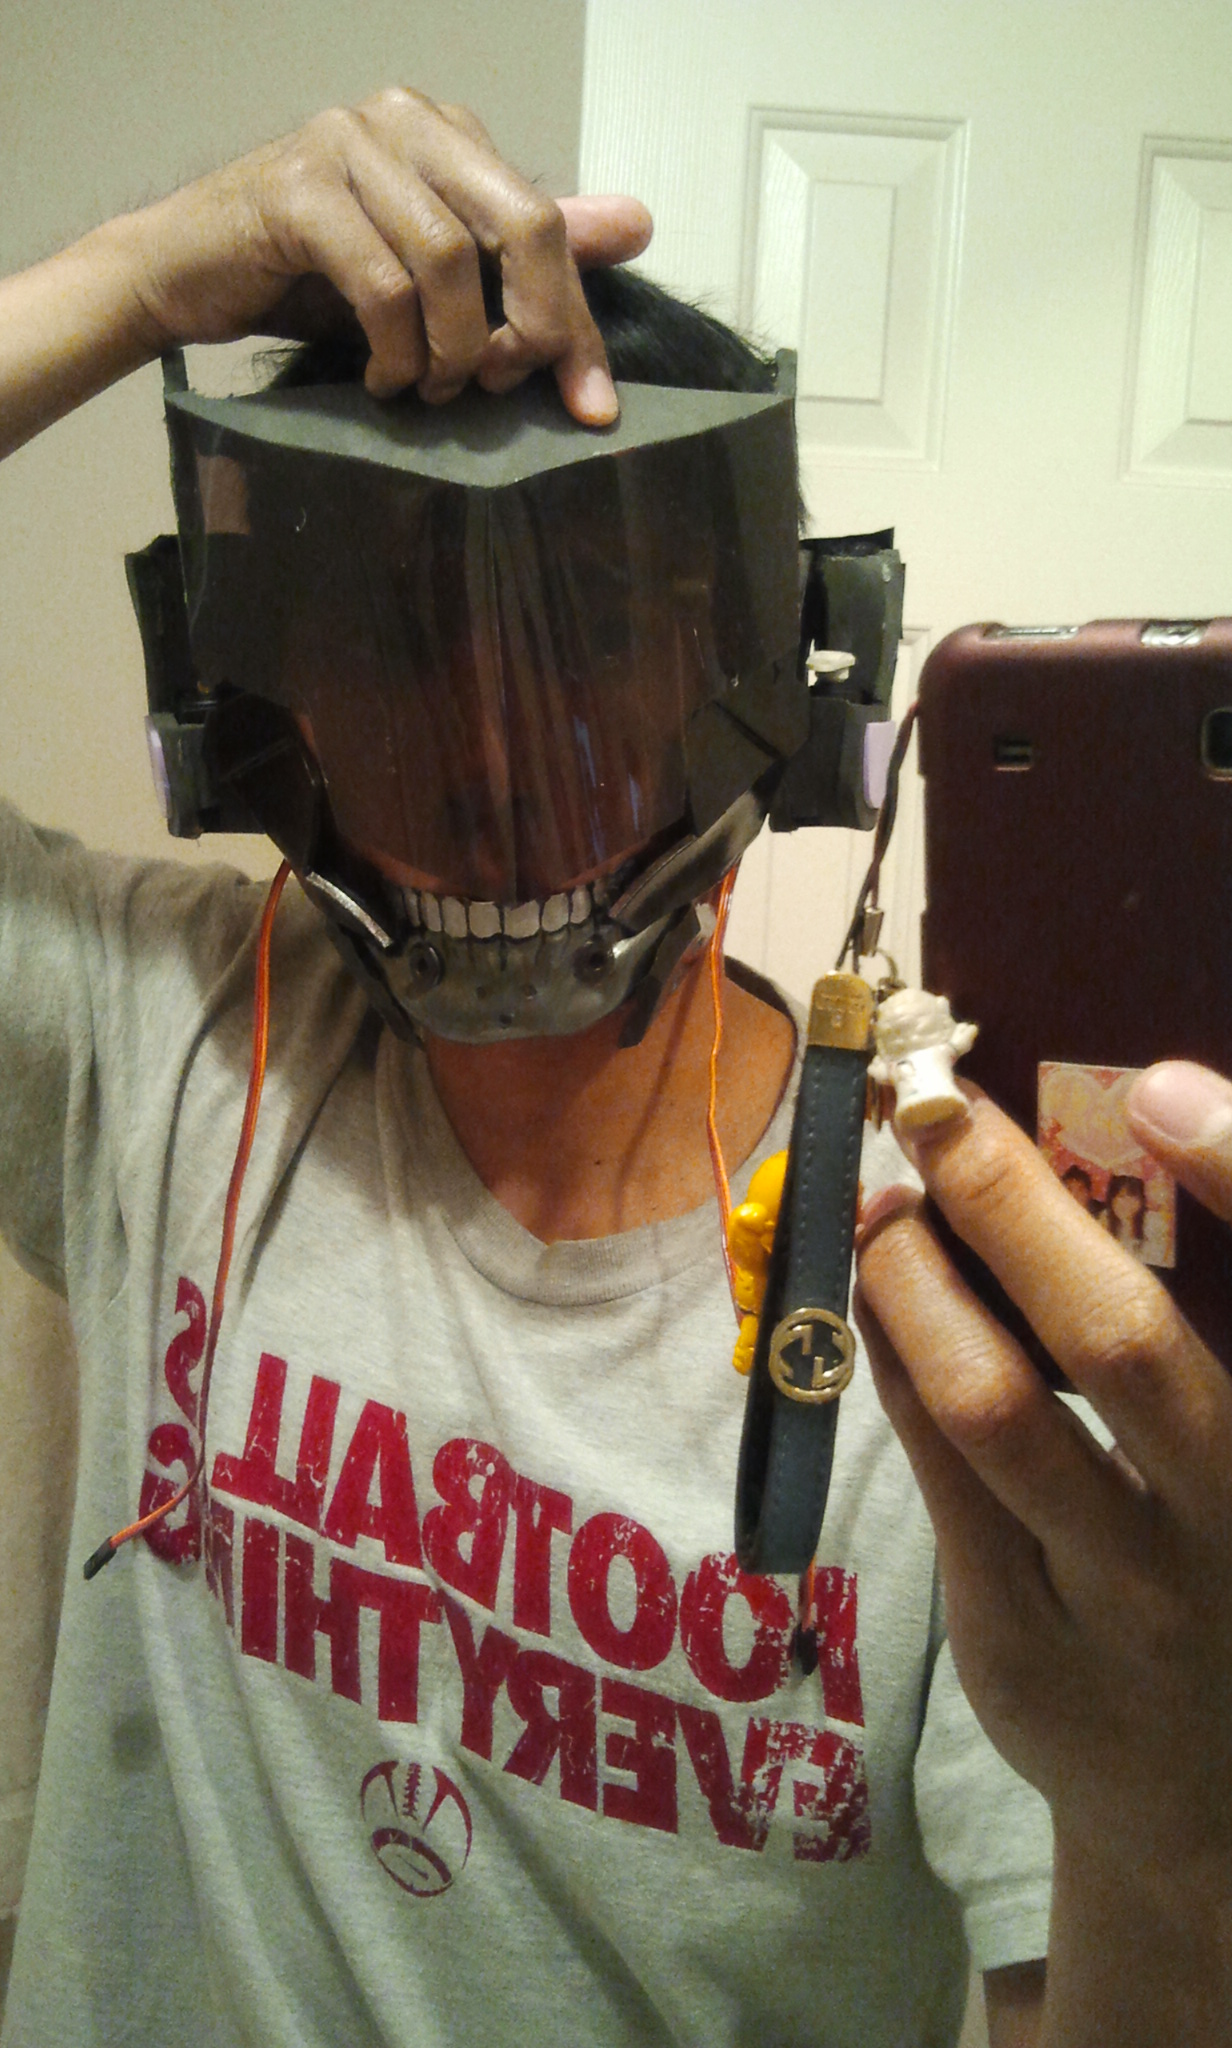
- Instead of making the jaw from scratch, I saw a member on the therpf.com had used a skull mask as a base for the jaw. I used my dremel to cut off the piece that I needed.
 Halloween skull mask
 Cut off jaw
 - I attached foam details with velcro and grommet details to the piece to shape it out
Details added to jaw
- I used elastic straps to hold the jaw to my face
- Threw some paint on the pieces and it was good to go.
Finished jaw held with eleastic
- I used an Arda Wigs “Cady” style which my friend dyed and styled for me. Arda’s website has some good tutorials on how to style their wigs.


—
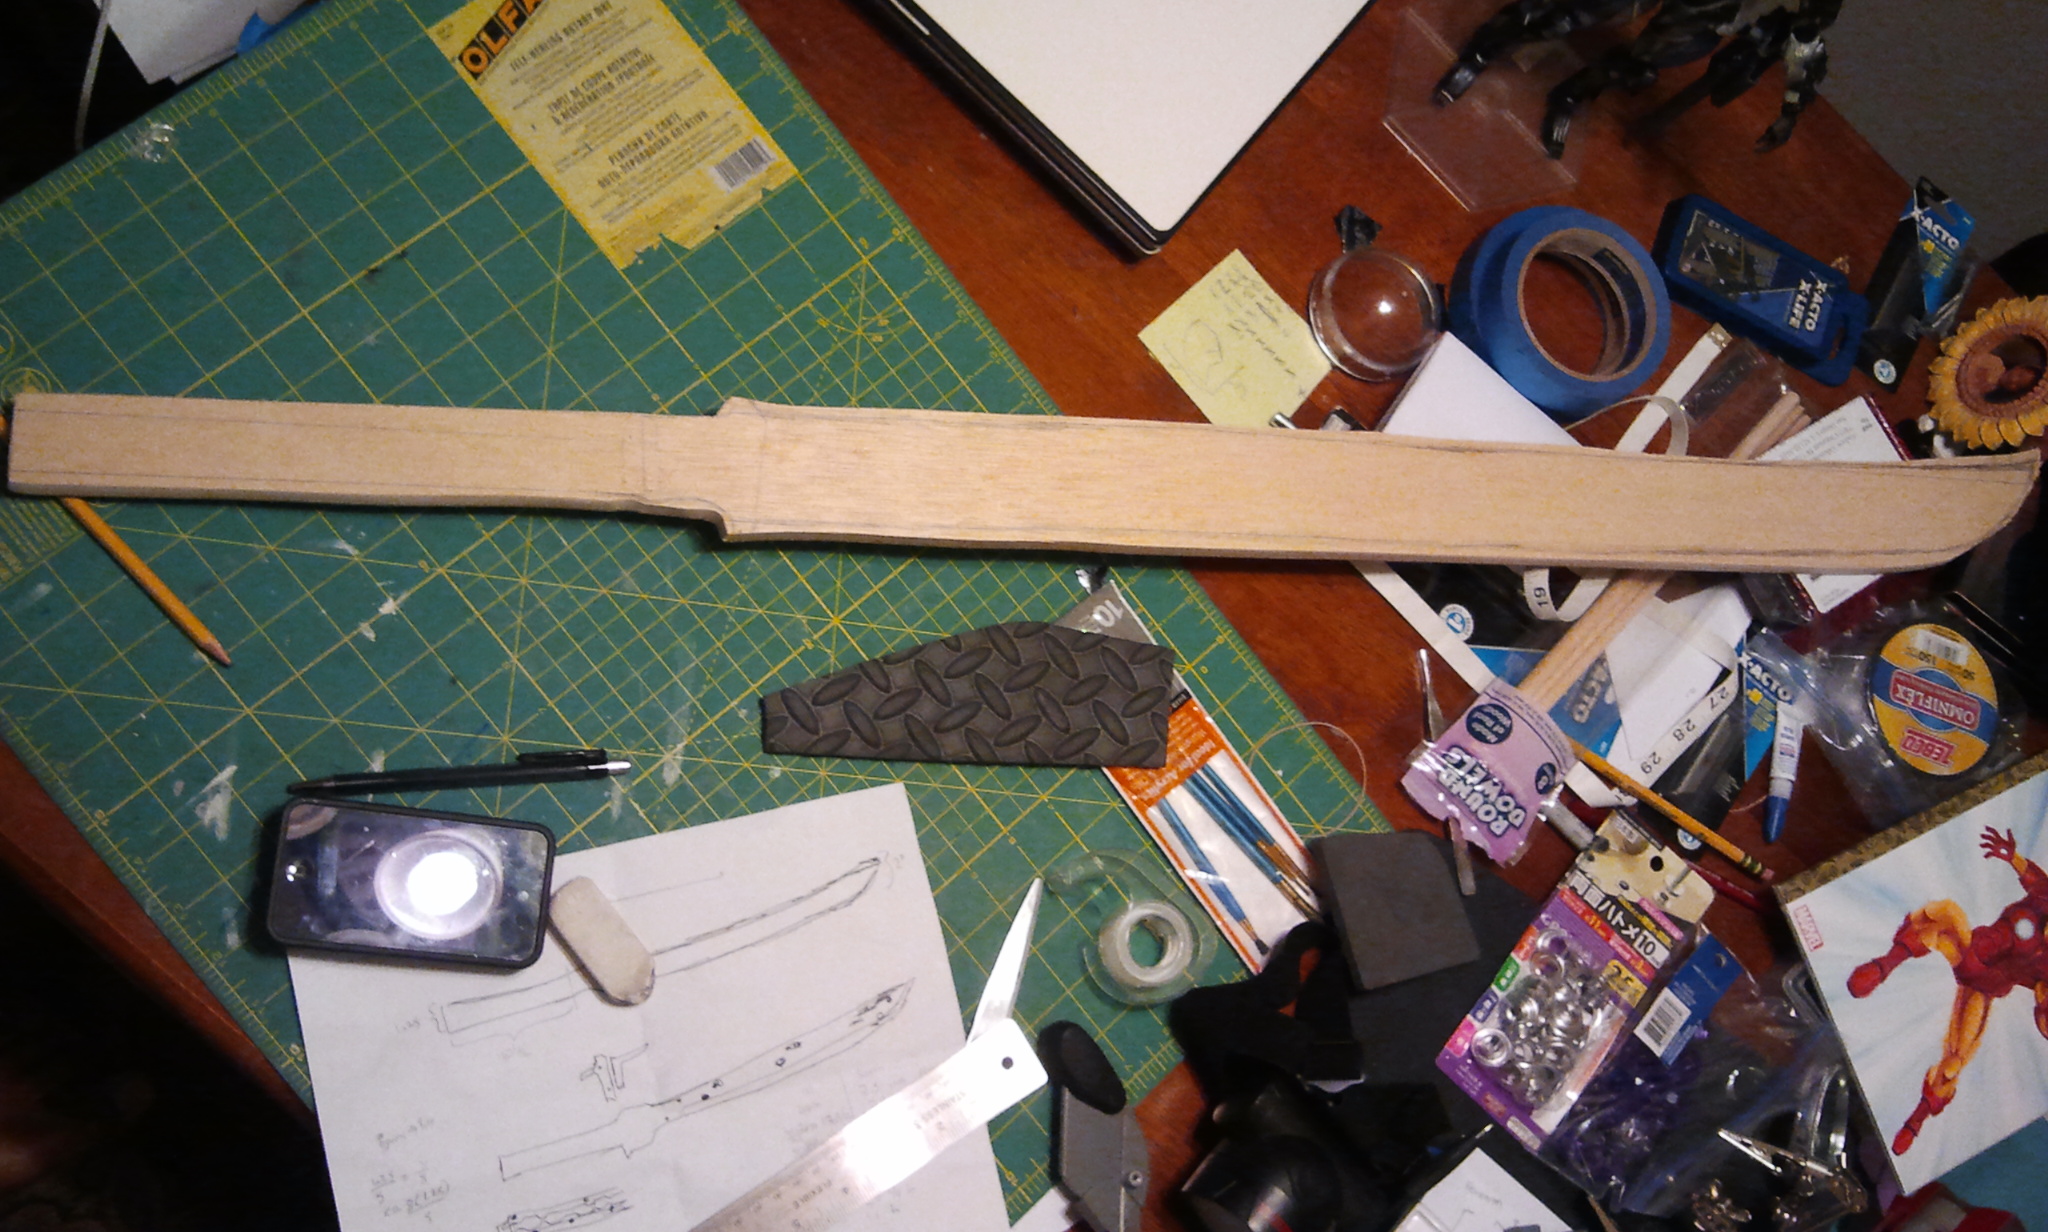
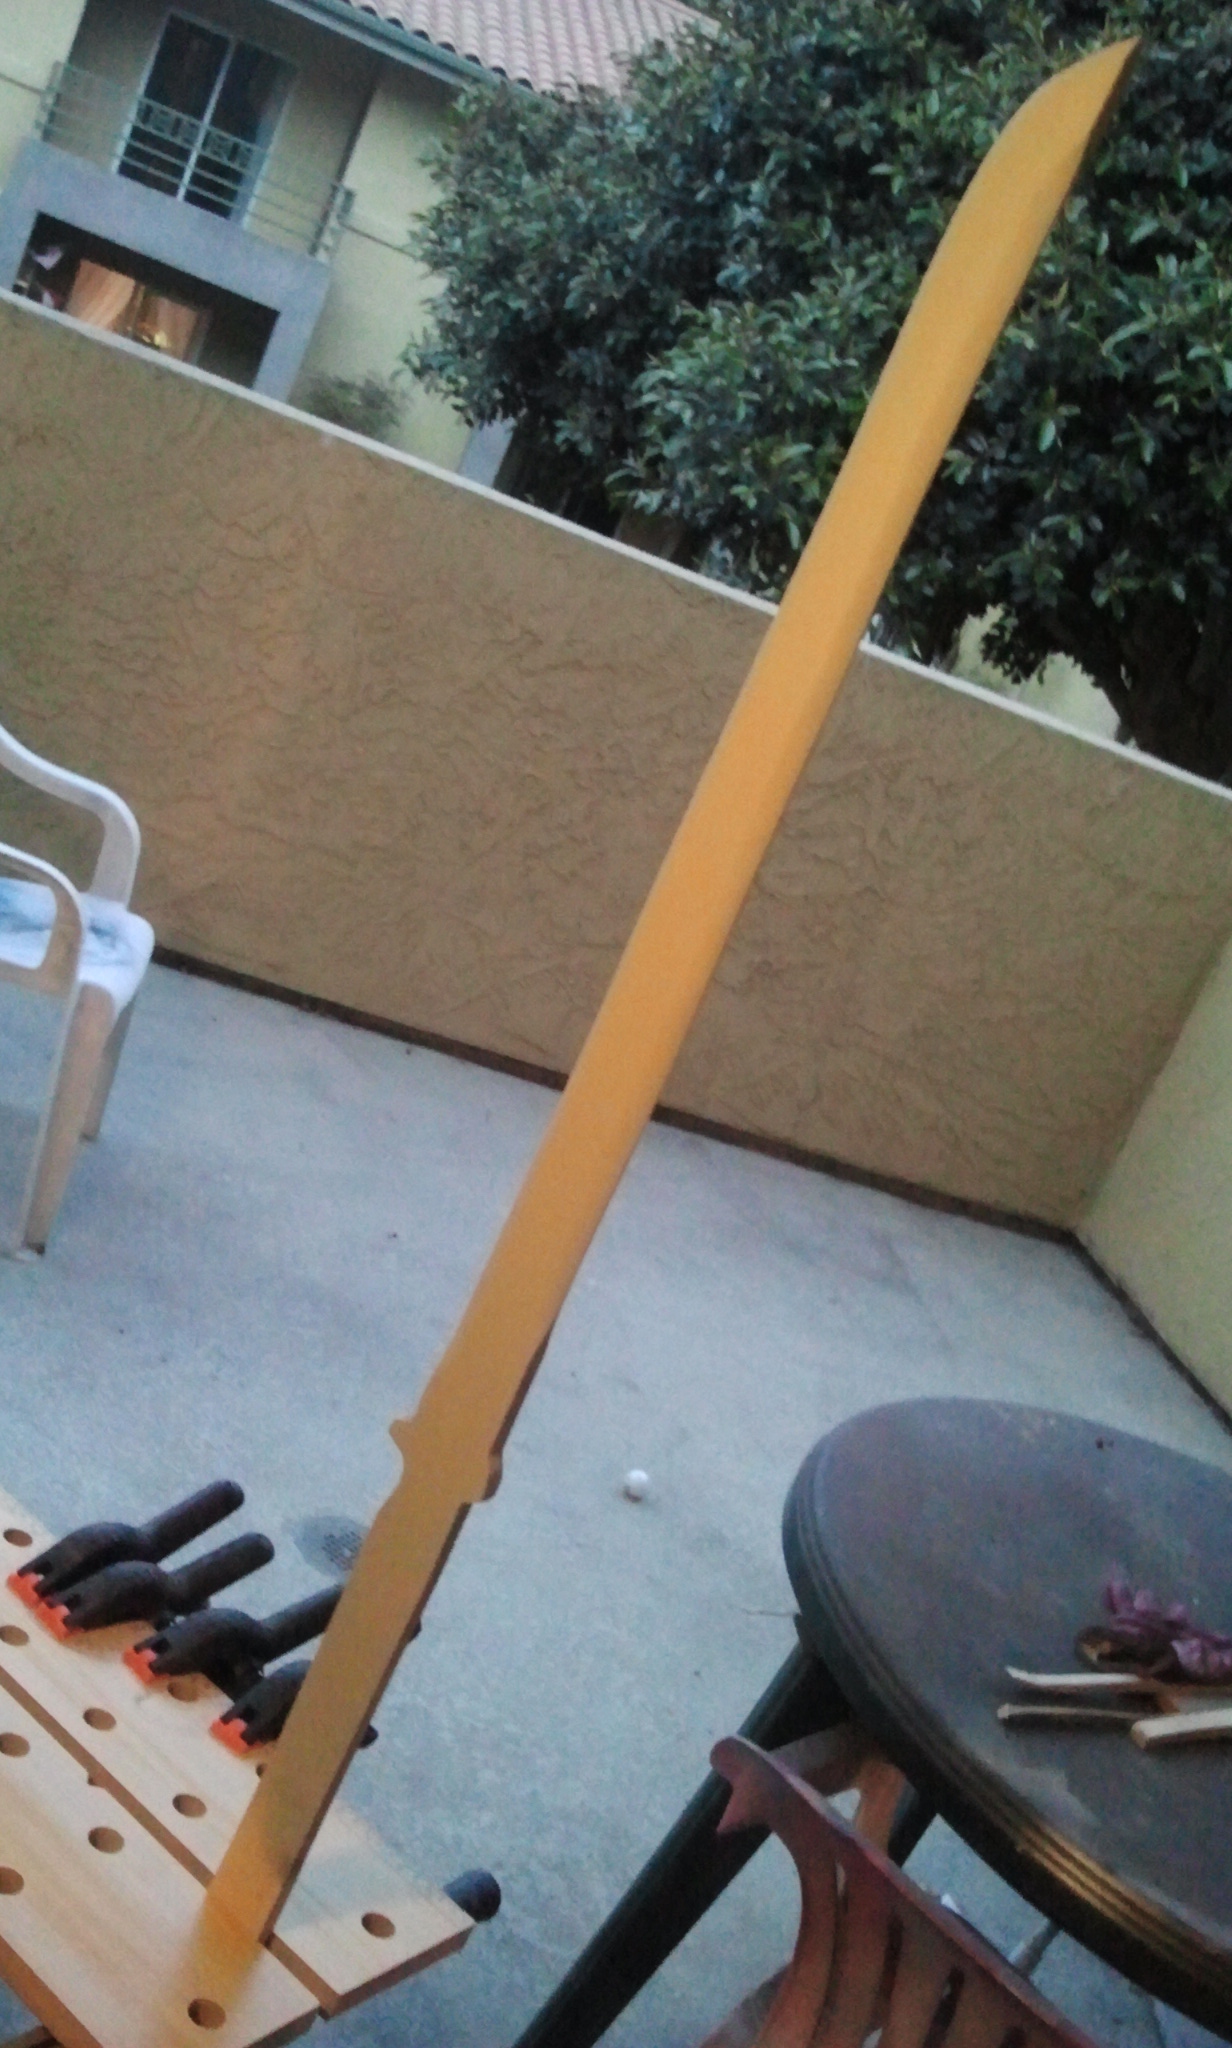
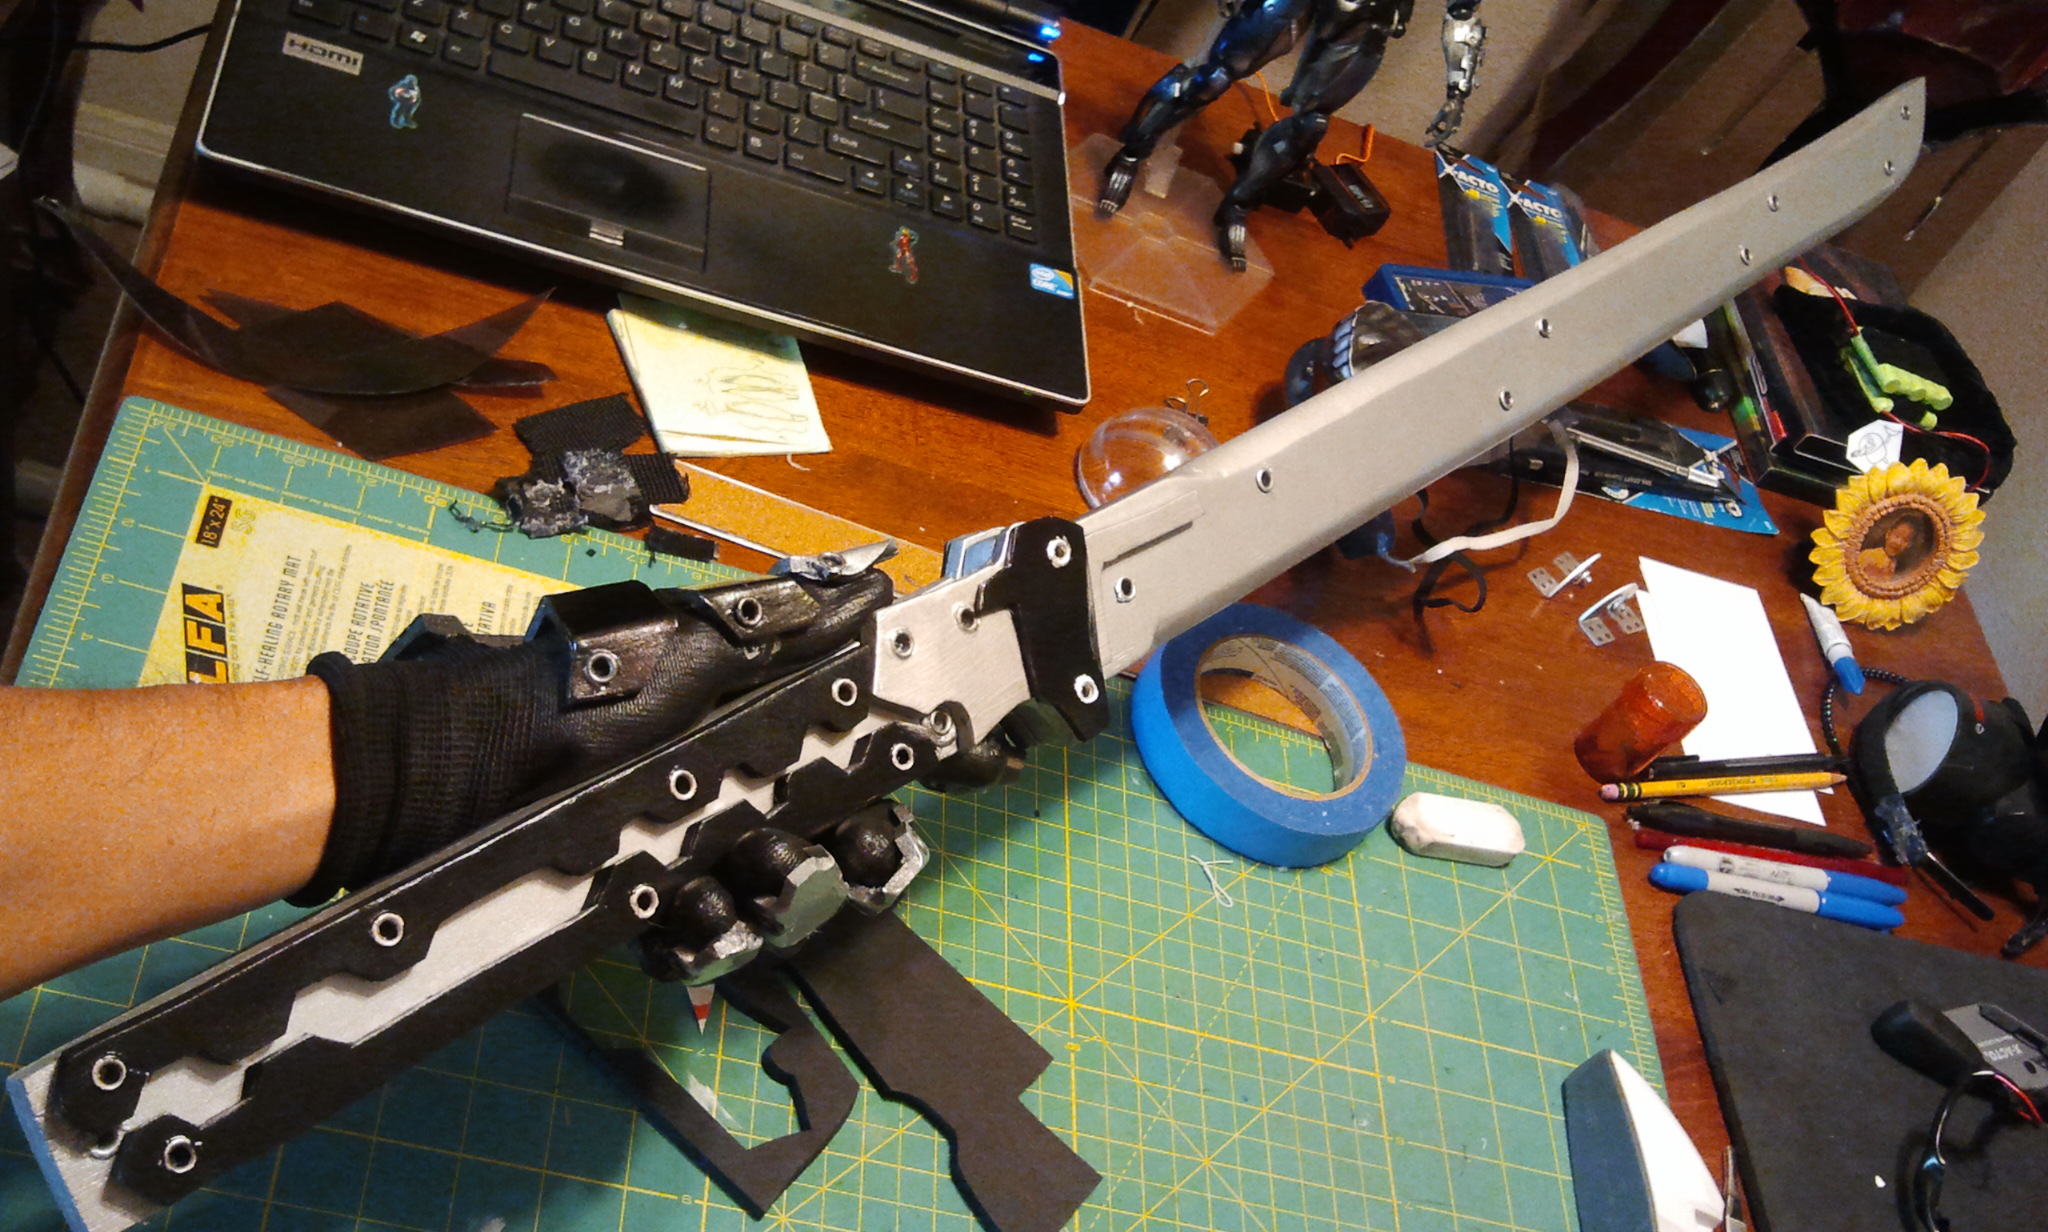
Stage 7: Sword
Materials I used for this stage:
- ½” plywood
- Various sizes of foam
- Jigsaw Cutter
- Adjustable sawhorse
- Bondo Glazing and Spot Putty
- 60, 120, 220 grit sandpaper
- Paints
Steps:
- I started by checking out my reference photos and patterned out the sword as described in “Creating Patterns” in stage 1
- I used the patterns to pencil sketch it onto the my plywood sheet
- I used a jigsaw to cut out the rough shape
Rough shape cut with jigsaw
- I hand sanded the edges of the “blade” in order to create the tip. It took a while, and I could have used a dremel, but I felt I had more control hand sanding.
- I used the automotive spot putty all over the wood and then sanded with 220 grit sand paper in order to minimize the wood grains
Sanding to get edge of blade “sharp”
- I then prime, painted, and clear coated the sword like I did with the rest of the pieces
- I used scrap foam for the handle details and eyelets for the circles on the blade
Foam detailed handle and eyelets on blade
—
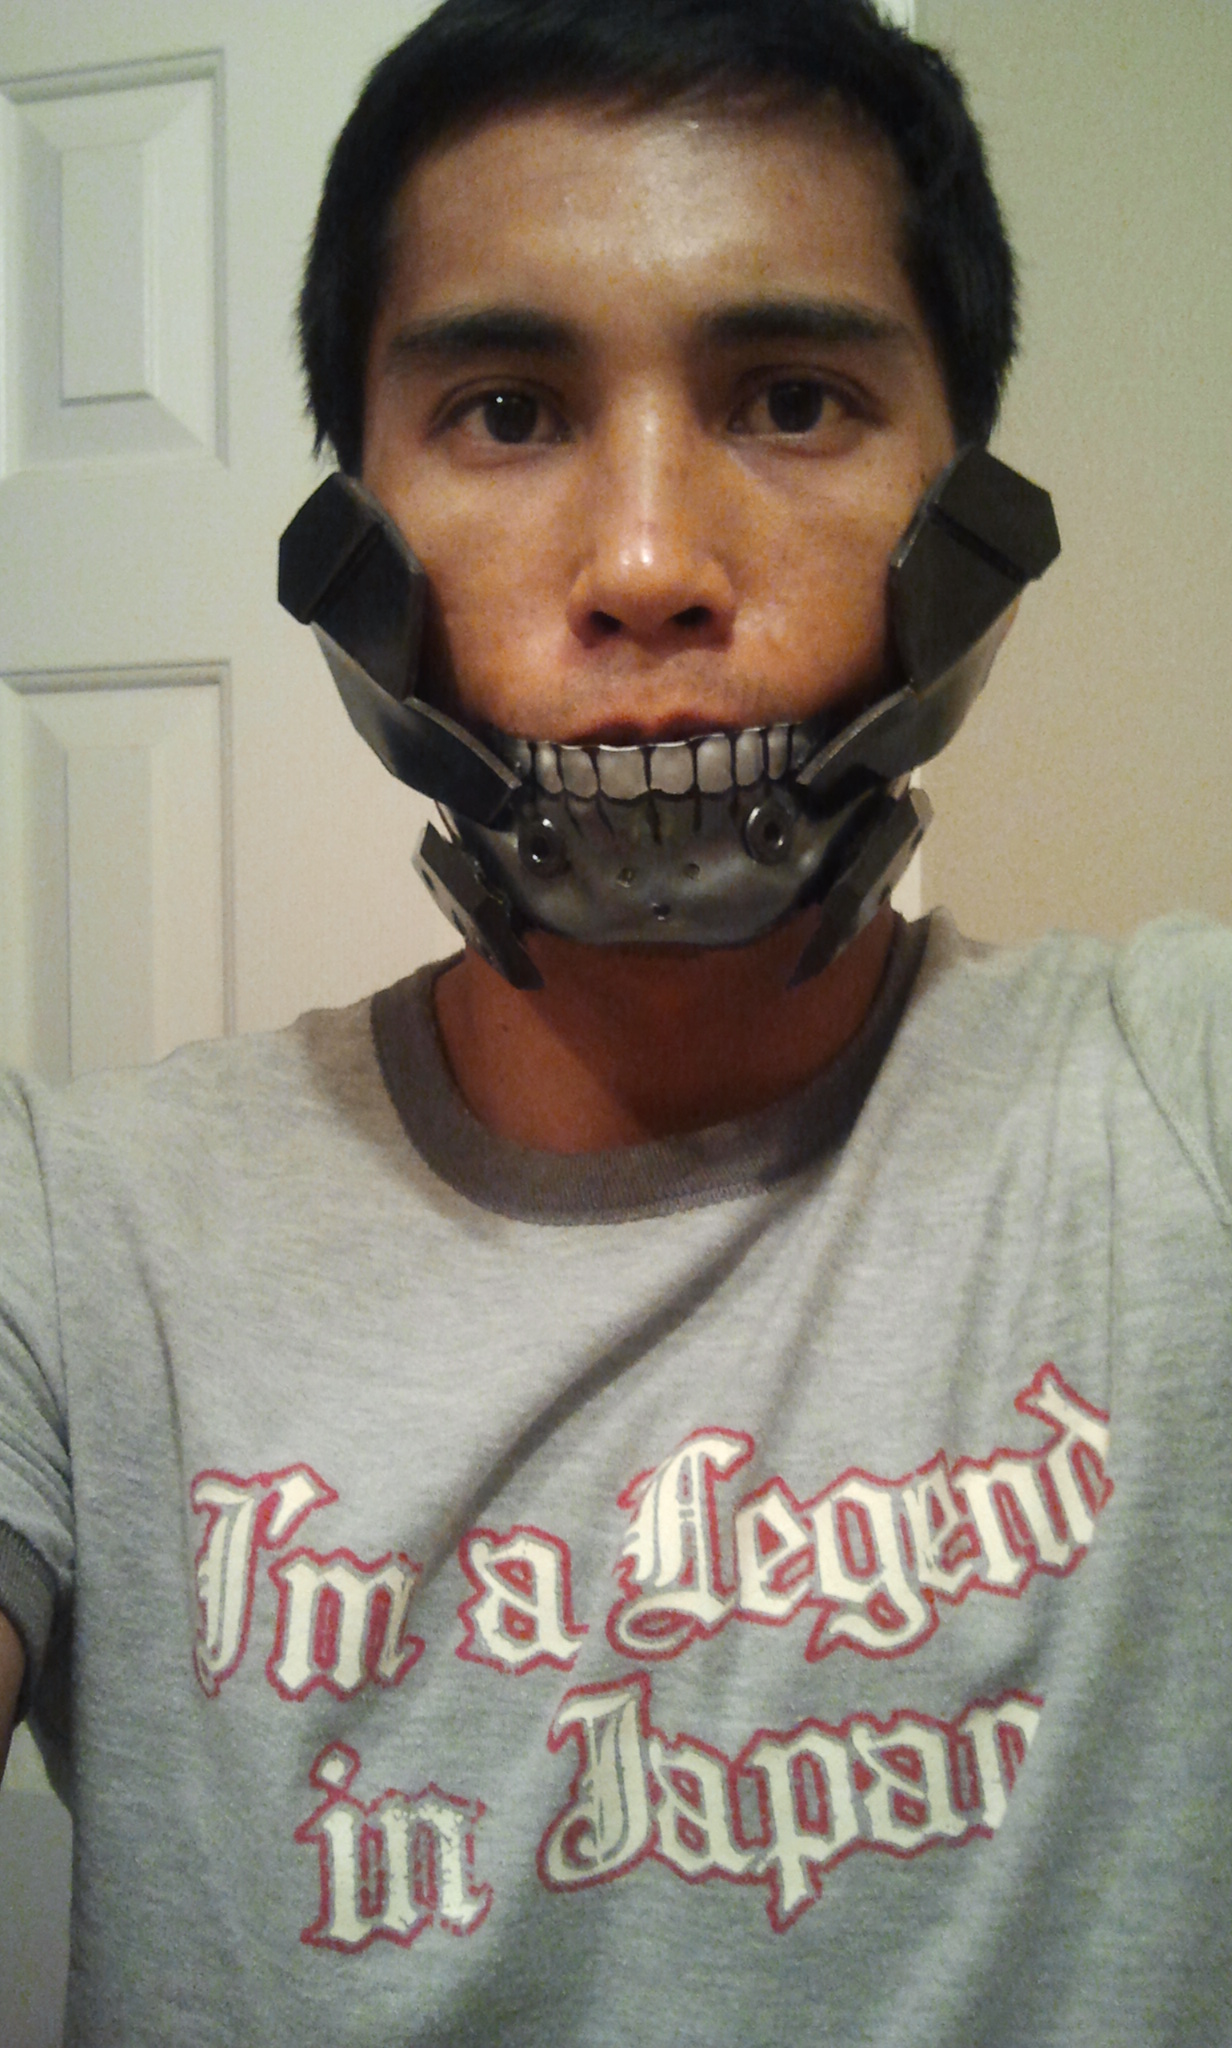
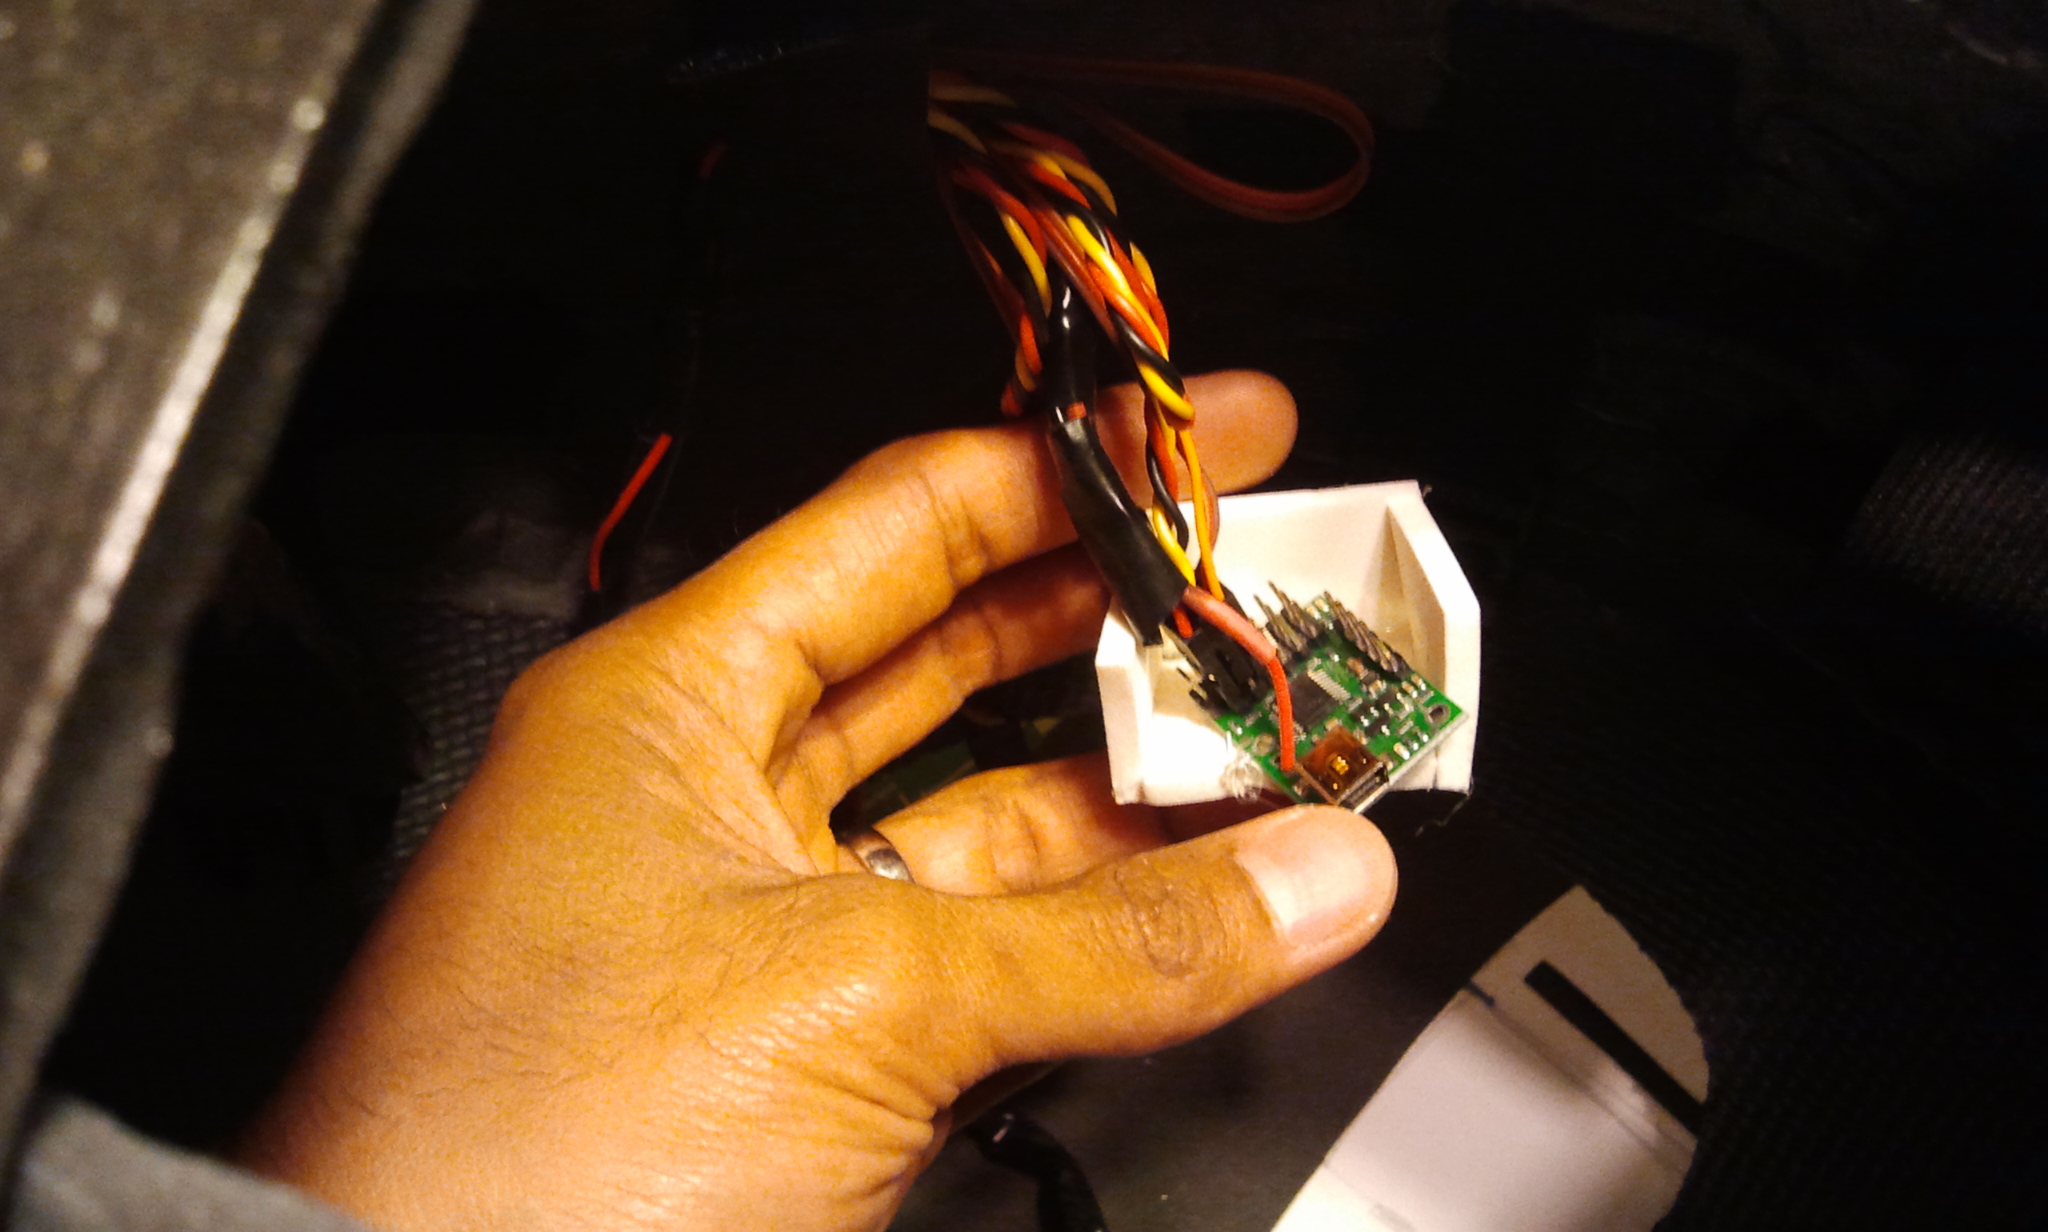
Stage 8: Ear piece, automated/motorized face mask, and lights
Materials I used for this stage:
- Foam
- Hairband
- Solar Face Shield
- Servos (I used 2 x HD-1501MG High Torque MG Servos)
- Pololu Micro Maestro 6 microcontroller + Users guide (I now use the Mini Maestro 12-channel USB Servo Controller)
- Pushbutton
- 2 x 6v RC batteries
- 9v batter holders
- LEDs
- Mylar Folder
Steps:
Test video of motorized face shield:
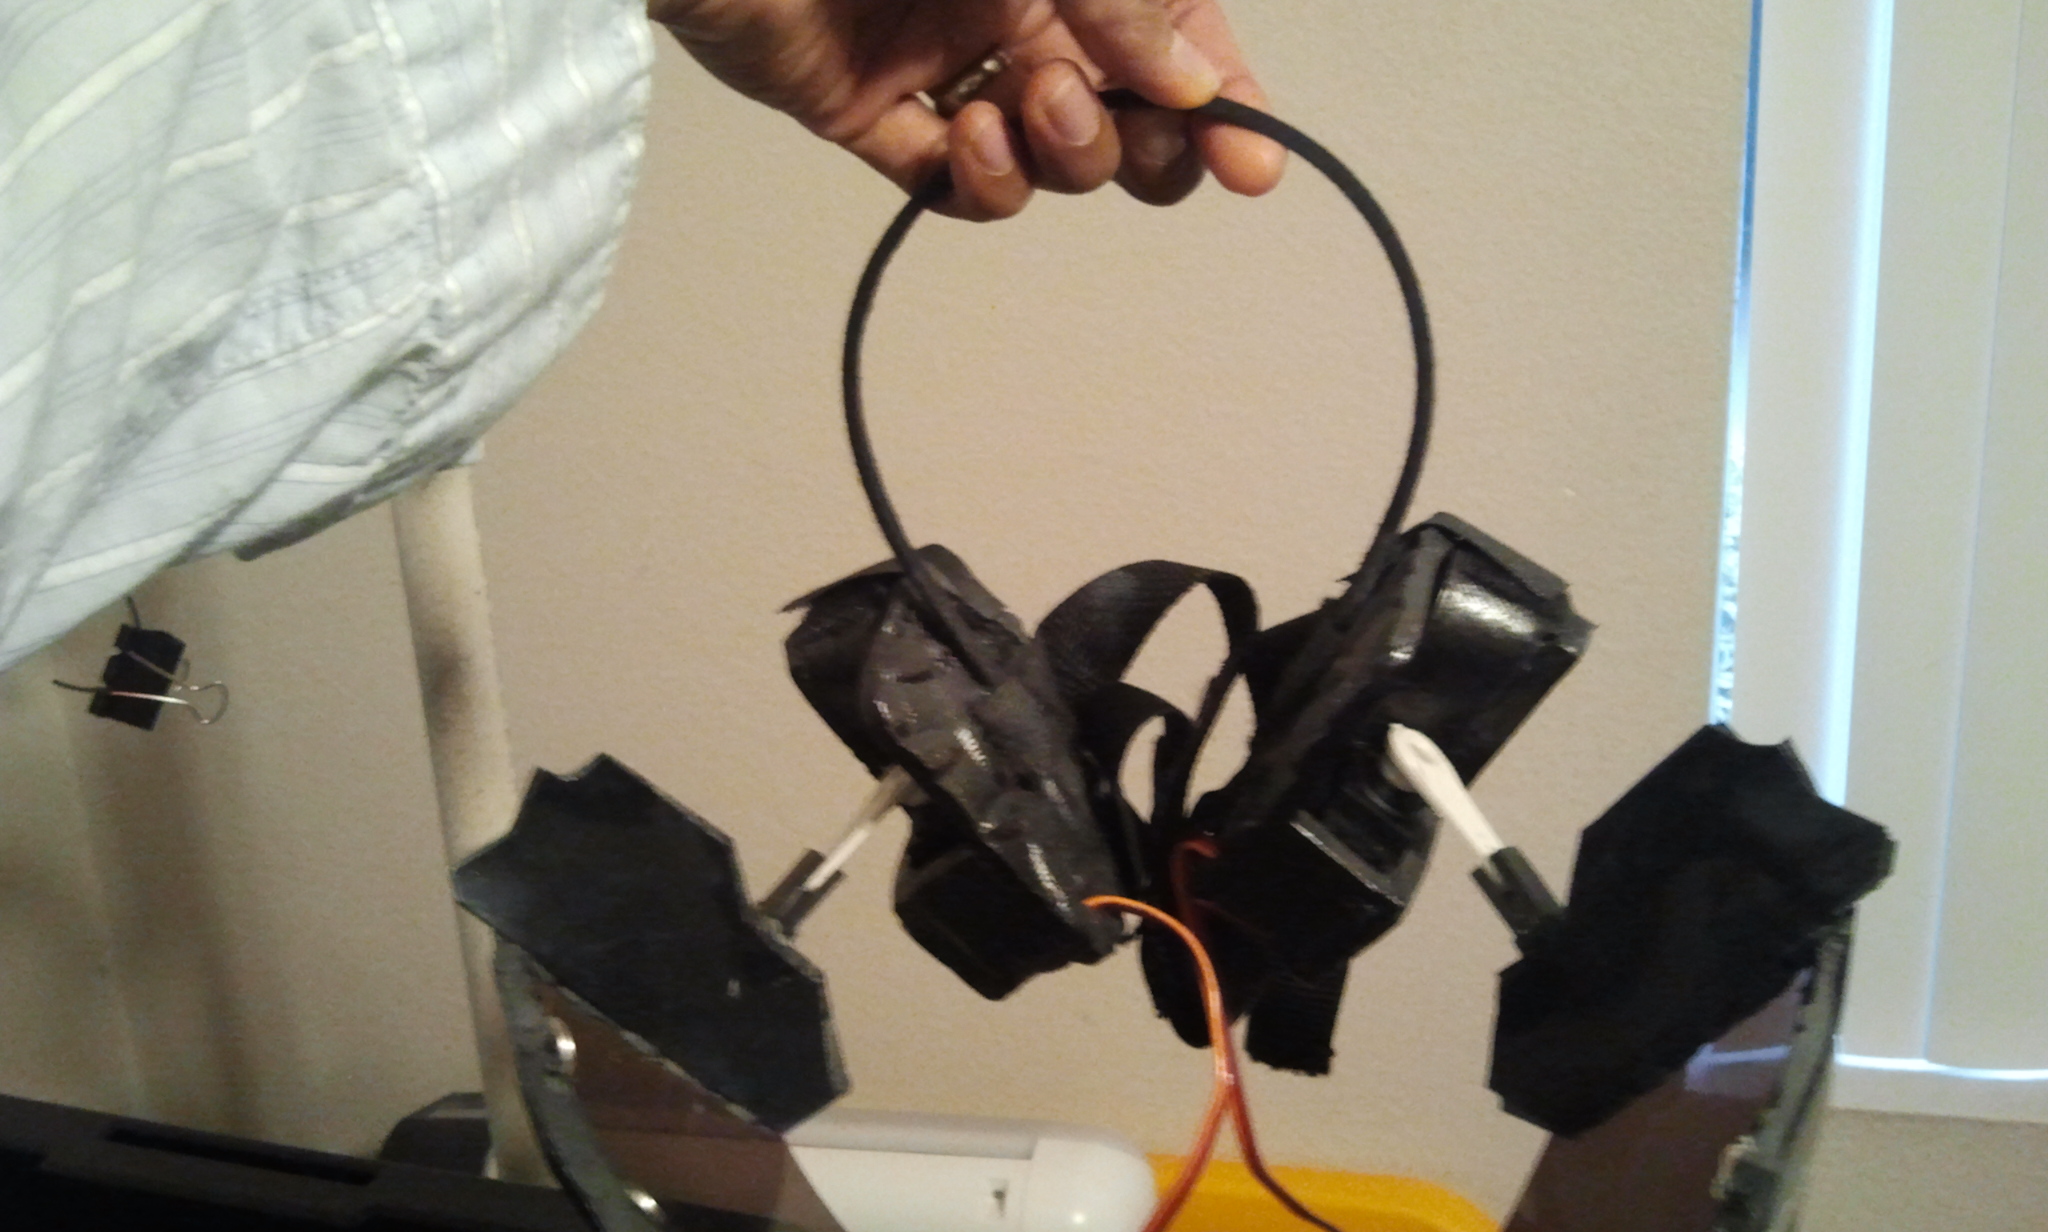
- I patterned the earmuffs with cardstock and made sure they would be able to fit servos and then made them out of foam
- I attached the earmuffs to a hairband that I would wear under my wig to hold the ears muffs in place
Headband with earmuffs
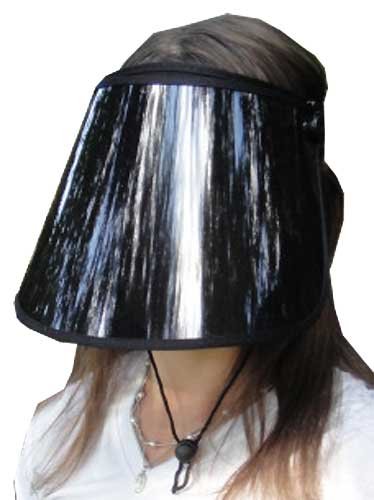
- I patterned the facemask with cardstock and then cut the patterns from a UV face shield
UV Face shield
- I glued scrap foam to the edges of the face shield in order to provide some stiffness
Checking mask size
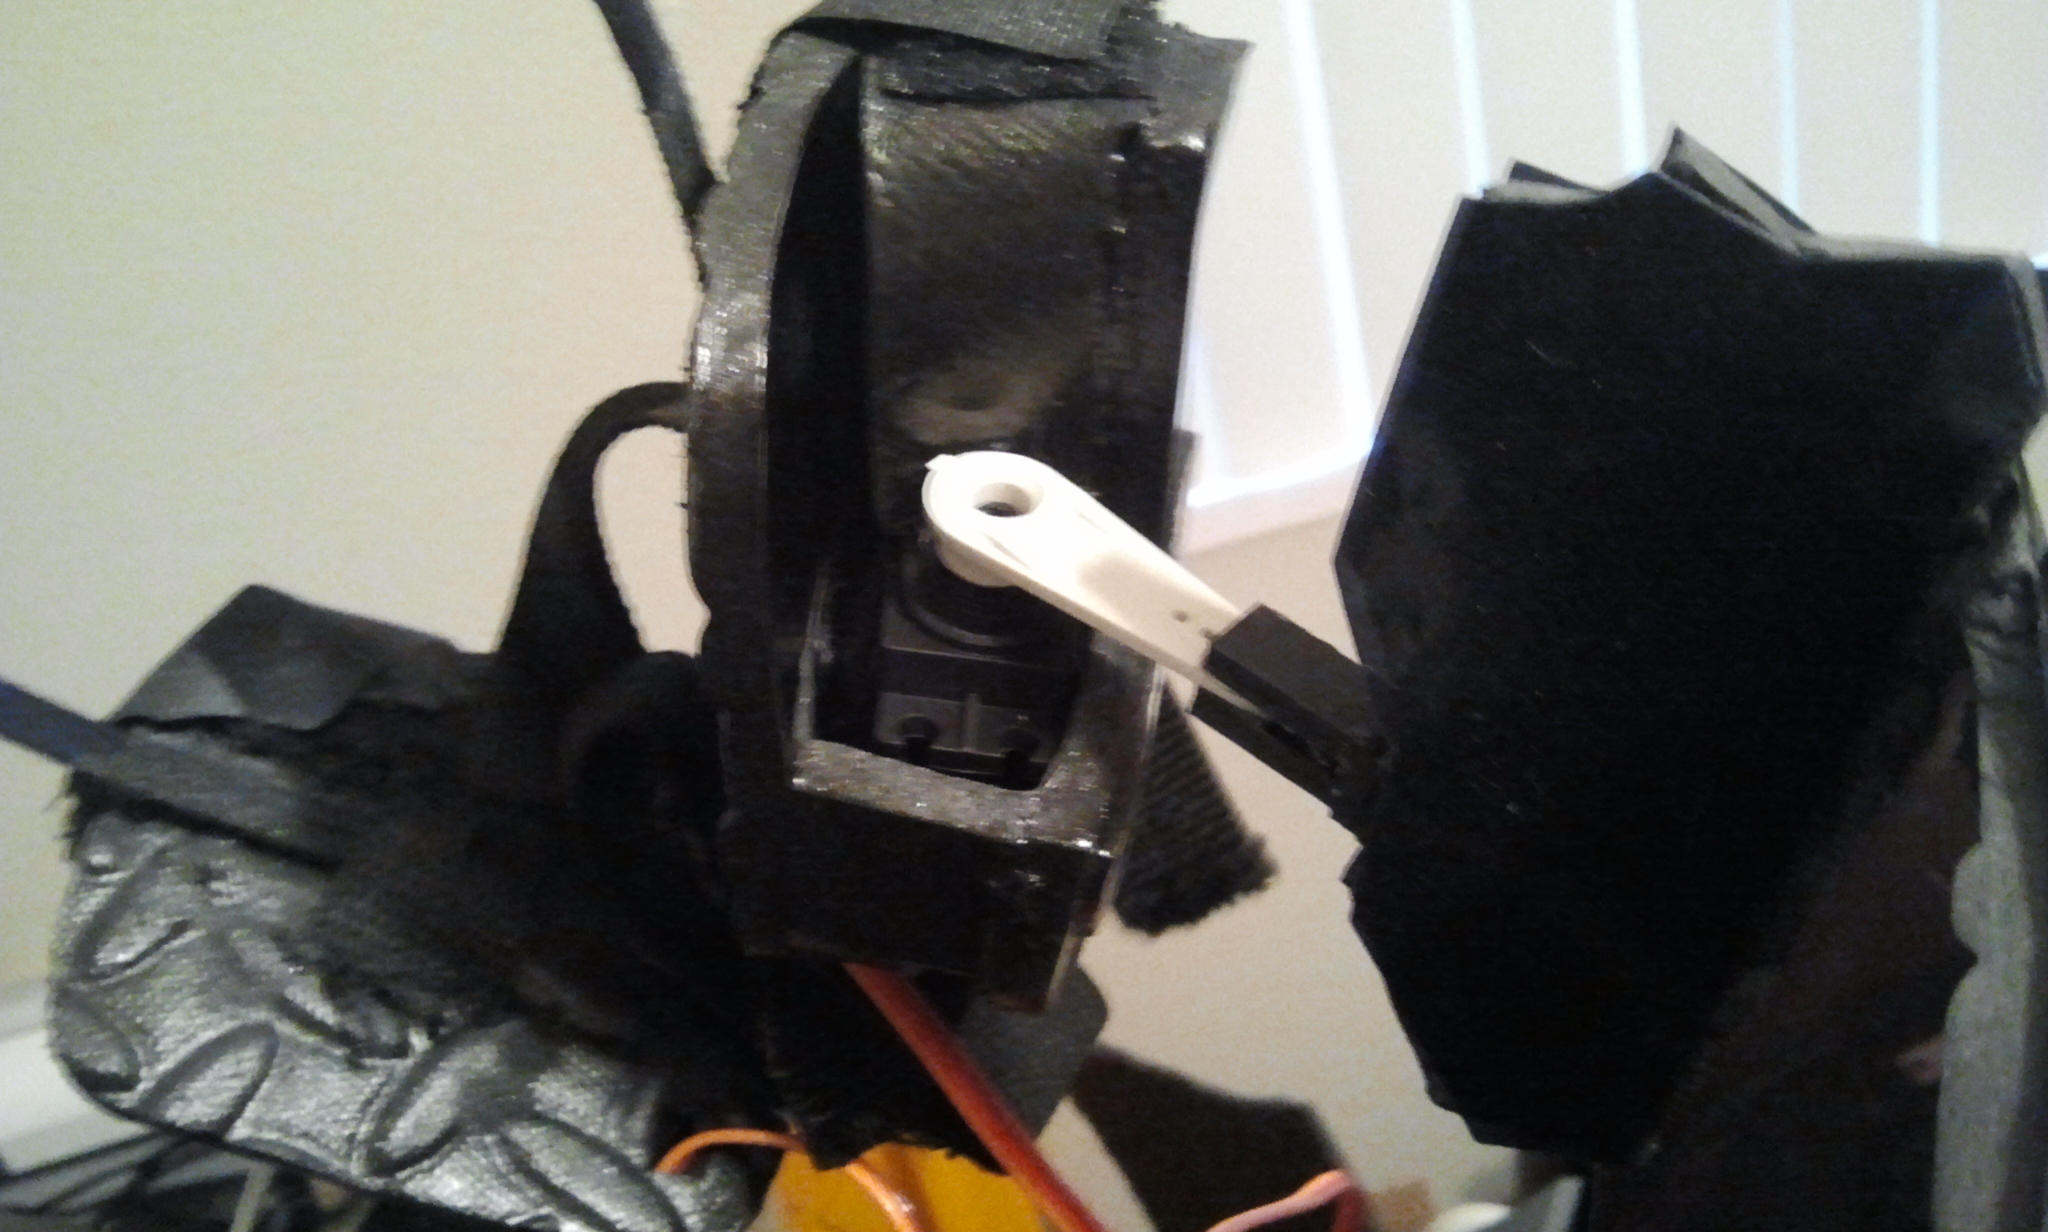
- I attached the ends of the faceplate to the servo horns so the servos could control the opening and closing
Servo horns attached to mask
- I programmed the microcontroller by modifying sample code from the Pololu website to move both servos at the push of a button that is activated through a wire down my arm
Pololu mounted in chest piece
- In the sheath, I wired some LEDs and a battery holder that I diffused with a blue mylar folder for the lighting effect
Sheath LEDs, Photo by BIizzardTerrak
—
And that pretty much sums it up. If you manage to get this far, suit up and have fun!
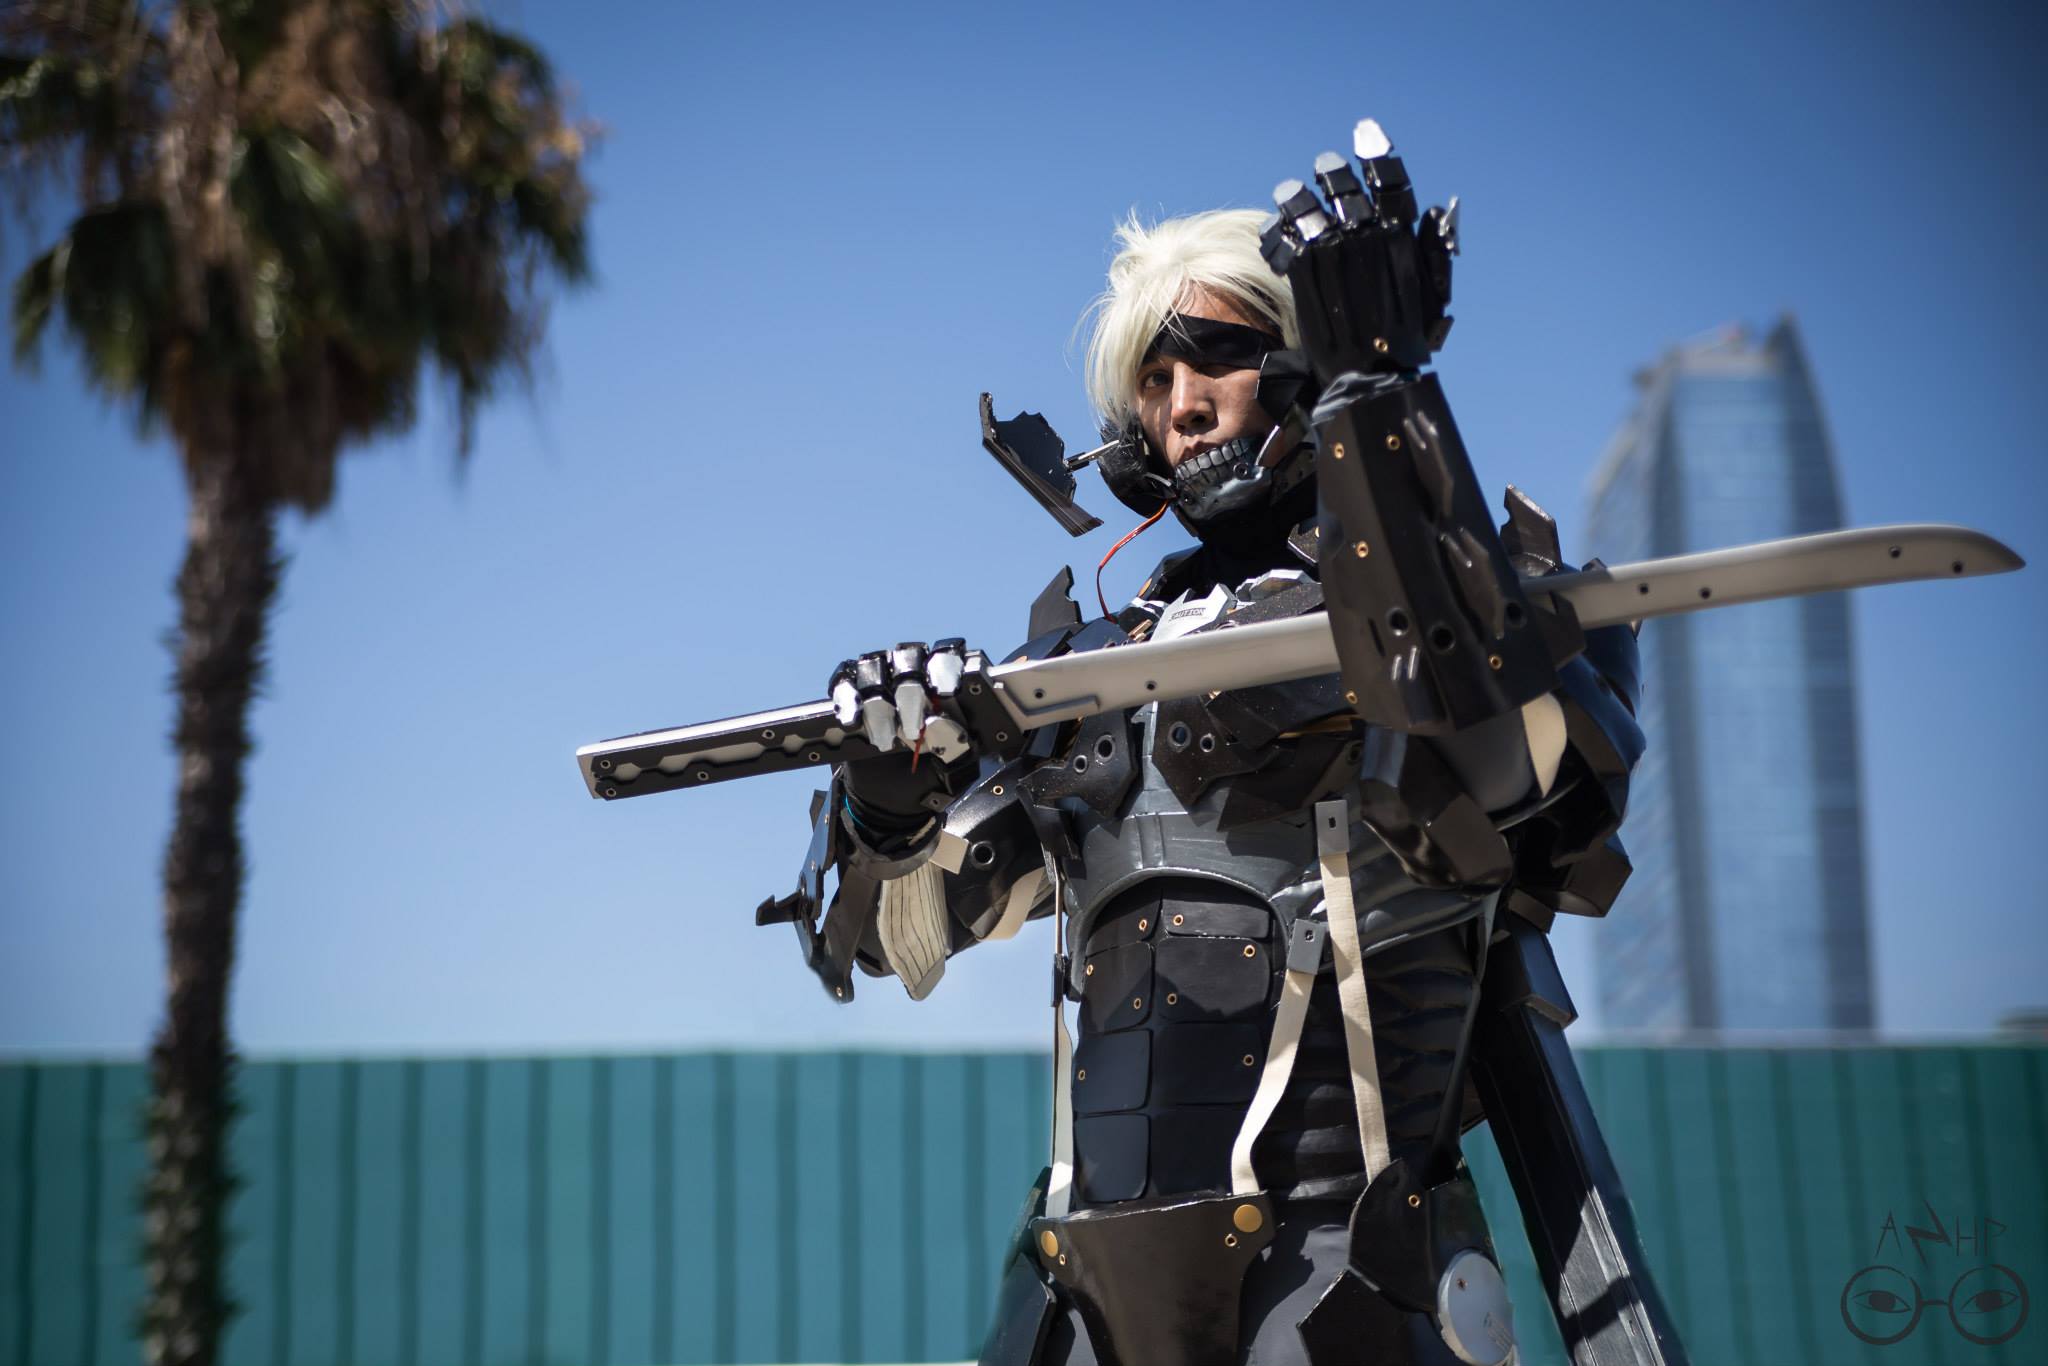
Photo by AzHP Photography


7 Comments
Matt · June 5, 2014 at 4:19 pm
Are you able to sit in this? Wouldn’t want to sit down and break the butt piece
Abe Luis Iglesias · July 29, 2014 at 7:04 pm
Is there a possible way to make it so that I can have Raiden’s Mask lock after I press the button?
Andrew Makes Things · July 29, 2014 at 9:08 pm
What do you mean lock?
Paul · October 5, 2014 at 6:40 pm
Would you ever make this again if someone were to pay you well?
Andrew Makes Things · October 12, 2014 at 9:08 pm
Maybe, but I am pretty busy.
Shikama · October 30, 2014 at 6:41 pm
OMG !! Thank you so much for this tutorial. I’m making my first armor and as a project for school. This is will really help me. Awesome cosplay !!
Pharrell's Happy, Now With Awesome Cosplayers - Cosoplay · July 29, 2017 at 9:44 am
[…] I’m not sure what’s more impressive about Andrew’s Raiden; the dance moves or the fact that mask moves (you can see how he made it here). […]